| Commando mode | Enable and disable Commando Mode and view Commando Mode control set details. |
|---|---|
| User profiles | Manage Marqeta Dashboard users by controlling access, viewing and editing user information, adding users, and defining roles. |
| Sandbox management | If you have signed up as a developer, manage your sandbox. |
| Audit logs | View audit logs for customer and business records. |
| ACH management | Enable ACH direct deposit. |
| PIN reveal | Display cardholder forgotten PINs to them via mobile application. |
| 3D secure | Enable and configure 3D Secure options. |
| Developer tools | If you have signed up as a developer, access tools for integrating with the Marqeta platform. |
How to…
- Manage Commando Mode
- View and manage Dashboard users
- View available user roles
- Add a user
- Enable or disable a user
- Impersonate a user
- View audit logs
- Manage your sandbox
- Manage ACH direct deposit
- Enable PIN Reveal
- Enable 3D Secure
- Access developer tools
Commando Mode
If your system cannot respond to a Gateway JIT Funding request, the Marqeta platform can use Commando Mode to make authorization decisions on your behalf based on defined business rules. The Marqeta platform stores any unsent webhooks for later transmission, so that card states and account balances on your system correspond with activity that occurred while Commando Mode was in effect.Viewing Commando Mode controls
To view current Commando Mode controls:-
Go to Program Controls > Control center > Commando mode. The current commando mode configurations and their status are displayed.
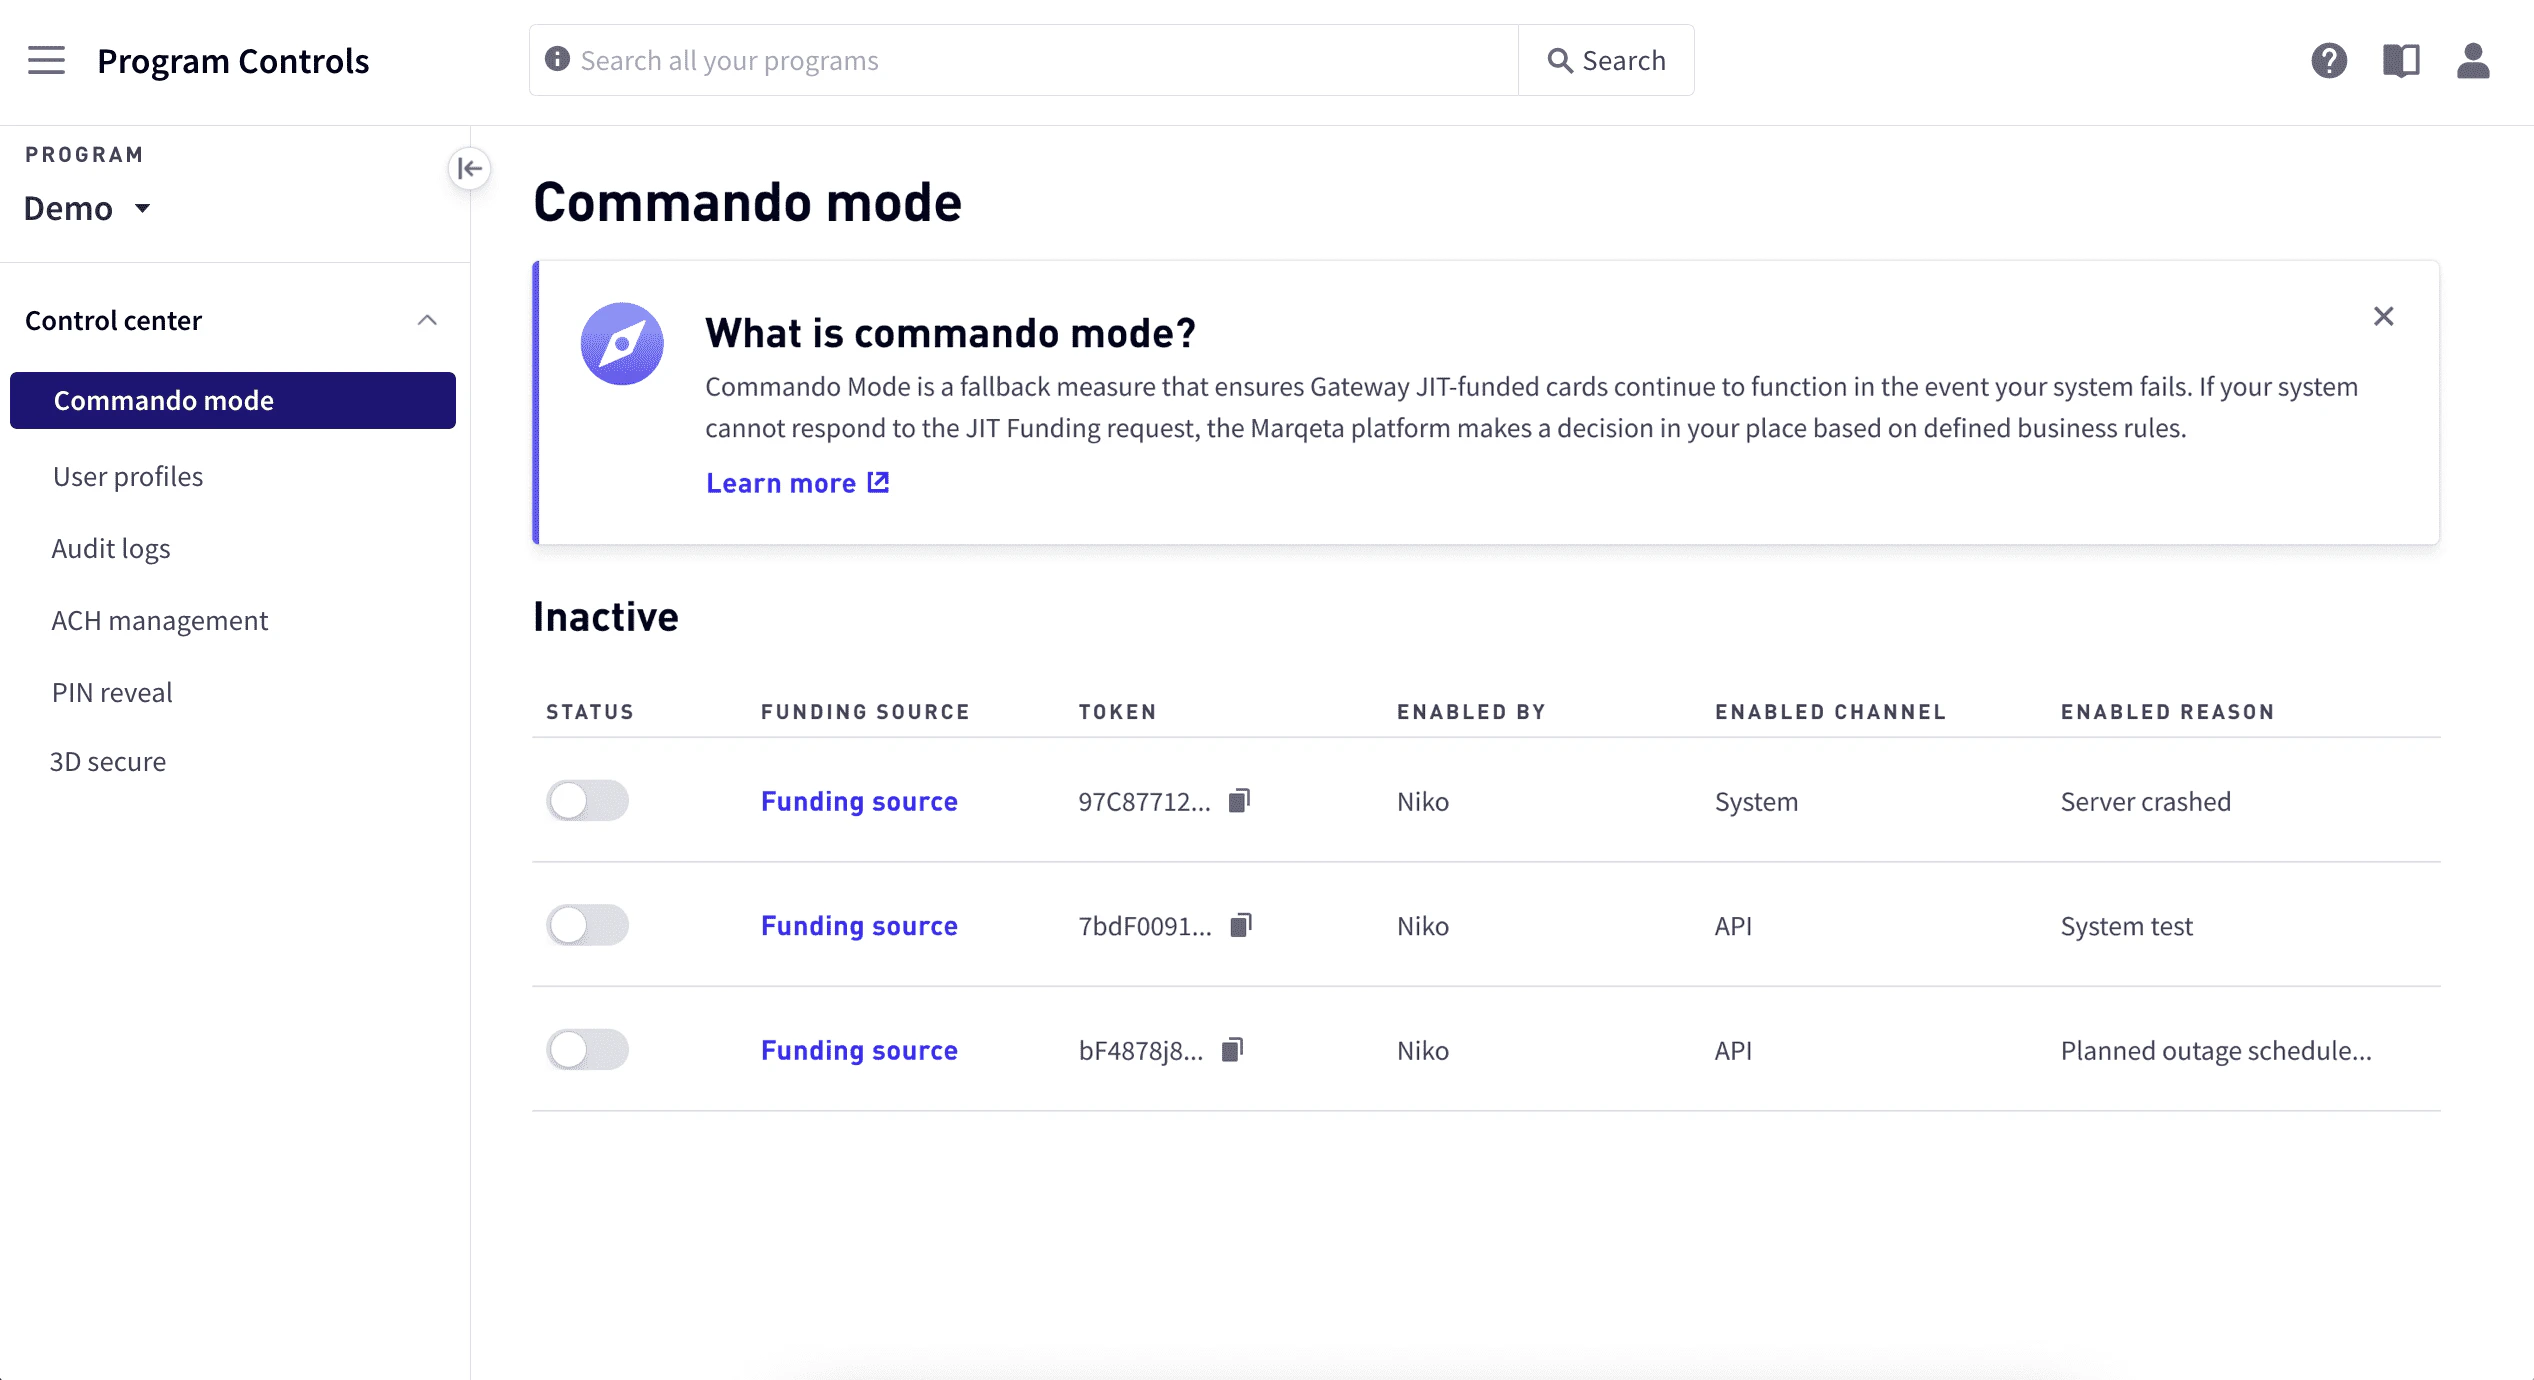
Enabling or disabling a Commando Mode control
To enable or disable a Commando Mode control:Viewing Commando Mode control information
To view Commando Mode control information:Go to Program Controls > Control center > Commando mode. The enabled by, enable channel, and enable reason are displayed at the top.
To enable or disable the current control, select the toggle button, enter a reason in the popup, and select Enable or Disable.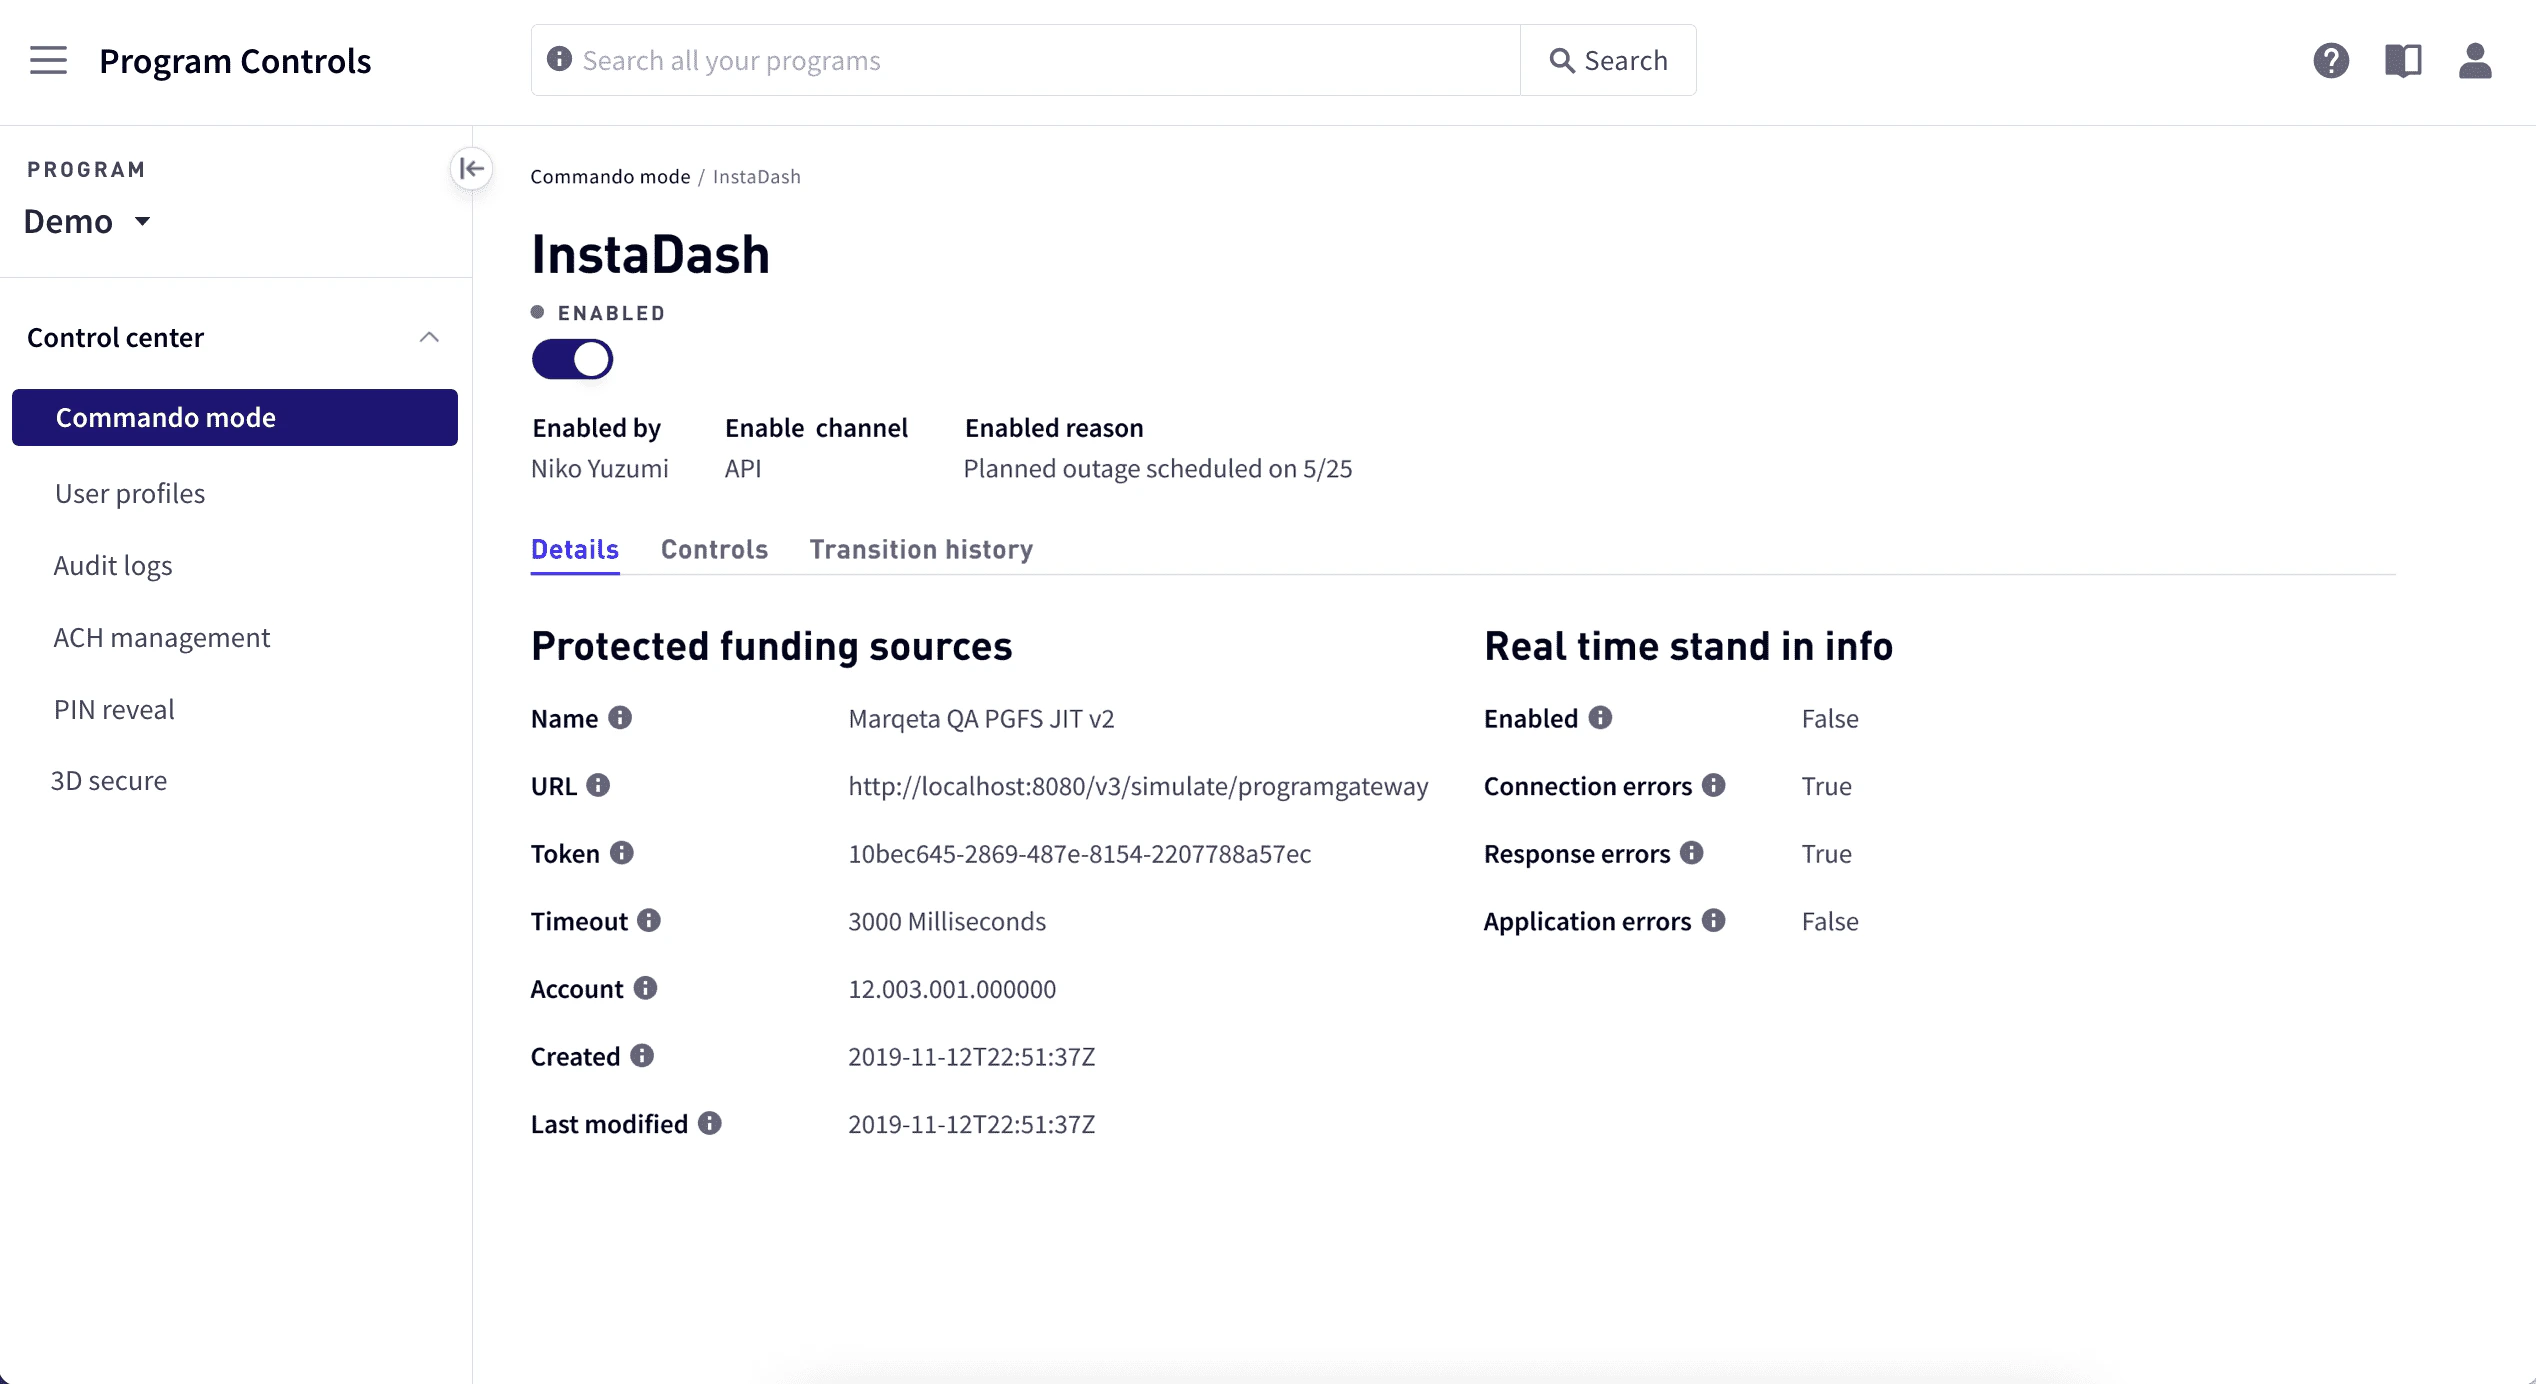
Commando mode control information
| Field | Description |
|---|---|
| Last Enabled By | The user who most recently enabled the Commando Mode control set. |
| Last Enabled Reason | The reason that the Commando Mode control set was last enabled. |
| Last Enabled Channel | The mechanism that most recently changed the Commando Mode control set’s state: API or SYSTEM |
Details
This tab shows details for Protected Funding Sources and Real Time Stand In Info.Protected funding sources
| Field | Description |
|---|---|
| Name | The name of the funding program. |
| Url | The URL of the gateway endpoint hosted in your environment, to which POST messages are submitted by Marqeta. |
| Token | The unique identifier of the funding source. |
| Timeout | Total timeout in milliseconds for gateway processing. |
| Account | Funding source account. |
| Created | A timestamp of when this Commando Mode was created in the Marqeta API. |
| Last Modified | A timestamp of when this Commando Mode was last updated in the Marqeta API. |
Real time stand in info
| Field | Description |
|---|---|
| Enabled | If true, Commando Mode is automatically enabled by events defined in the real_time_standin_criteria object; if false, Auto Commando Mode is not enabled. |
| Include Connection Errors | If true, a non-timeout connection error automatically enables Commando Mode when real_time_standin_criteria.enabled is also true. |
| Include Response Errors | If true, a gateway response slower than 3000 milliseconds automatically enables Commando Mode when real_time_standin_criteria.enabled is also true. |
| Include Application Errors | If true, an application error (any non-connection, non-timeout error) automatically enables Commando Mode when real_time_standin_criteria.enabled is also true. |
Controls
This tab provides information on the velocity control set defined for this Commando Mode control.Velocity controls
| Field | Description |
|---|---|
| Token | The unique identifier of the velocity control set. |
| Name | The name of the funding program. |
| Usage Limit | Maximum number of times (between 0 and 100) a card can be used within the time period defined by the velocity_window field. |
| Approvals Only | If true, only approved transactions are subject to control. |
| Include Purchases | Indicates whether purchases are subject to control. |
| Include Withdrawals | Indicates whether ATM withdrawals are subject to control. |
| Include Transfers | Indicates whether transfers are subject to control. |
| Include Cashback | Indicates whether cashbacks from a point of sale are subject to control. |
| Currency Code | The three-digit ISO 4217 currency code: USD or CAD. |
| Amount Limit | The maximum monetary sum that can be cleared within the time period defined by the Velocity Window field. |
| Velocity Window | Defines the time period to which the amount_limit and usage_limit fields apply:- DAY - one day; days begin at 00:00:00.- WEEK - one week; weeks begin Mondays at 00:00:00.- MONTH - one month; months begin on the first day of month at 00:00:00.- QUARTER - three months; quarters begin on January 1, April 1, July 1, and October 1 at 00:00:00 UTC.- YEAR - twelve months; years begin on January 1 at 00:00:00 UTC.- LIFETIME - forever; time period never expires.- TRANSACTION - a single transaction.If set to DAY, WEEK, or MONTH, the velocity control takes effect retroactively from the beginning of the specified period. The amount and usage data already collected within the first period is counted toward the limits. |
| Active | Indicates whether the program gateway funding source is active. |
Auth controls
This table describes the authorization controls defined for this Commando Mode control set.| Field | Description |
|---|---|
| Token | The unique identifier of the auth controls. |
| Name | The name of the auth controls. |
| Start Time | The starting time for the auth controls. |
| End Time | The ending time for the auth controls. |
| Active | Indicates whether the auth controls are active. |
Transition history
This tab provides details for each of the transitions for this Commando Mode control set.| Field | Description |
|---|---|
| Enabled | Indicates the current status of the Command Mode control set. |
| Reason | The reason the current state of the Commando Mode control set was changed. |
| Channel | The mechanism that changed the Commando Mode control set’s state: API or SYSTEM |
| Username | Identifies the user who changed the Commando Mode control set’s state. |
| Token | The unique identifier of the Commando Mode transition. |
| Type | The type of transition: enabled or disabled. |
| Commando Mode Token | The unique identifier of the Commando Mode control set. |
| Created | The date and time when the transition was created. |
| Name | The name of the transition. |
User profiles
Warning
We are planning to deprecate this version of User Profiles in the near future. Rather than this version of User Profiles, you should begin using User Profile Management as soon as possible.
We are planning to deprecate this version of User Profiles in the near future. Rather than this version of User Profiles, you should begin using User Profile Management as soon as possible.
- View user information.
- Add users and edit user information.
- Define user roles.
- Enable and disable users.
- Impersonate users.
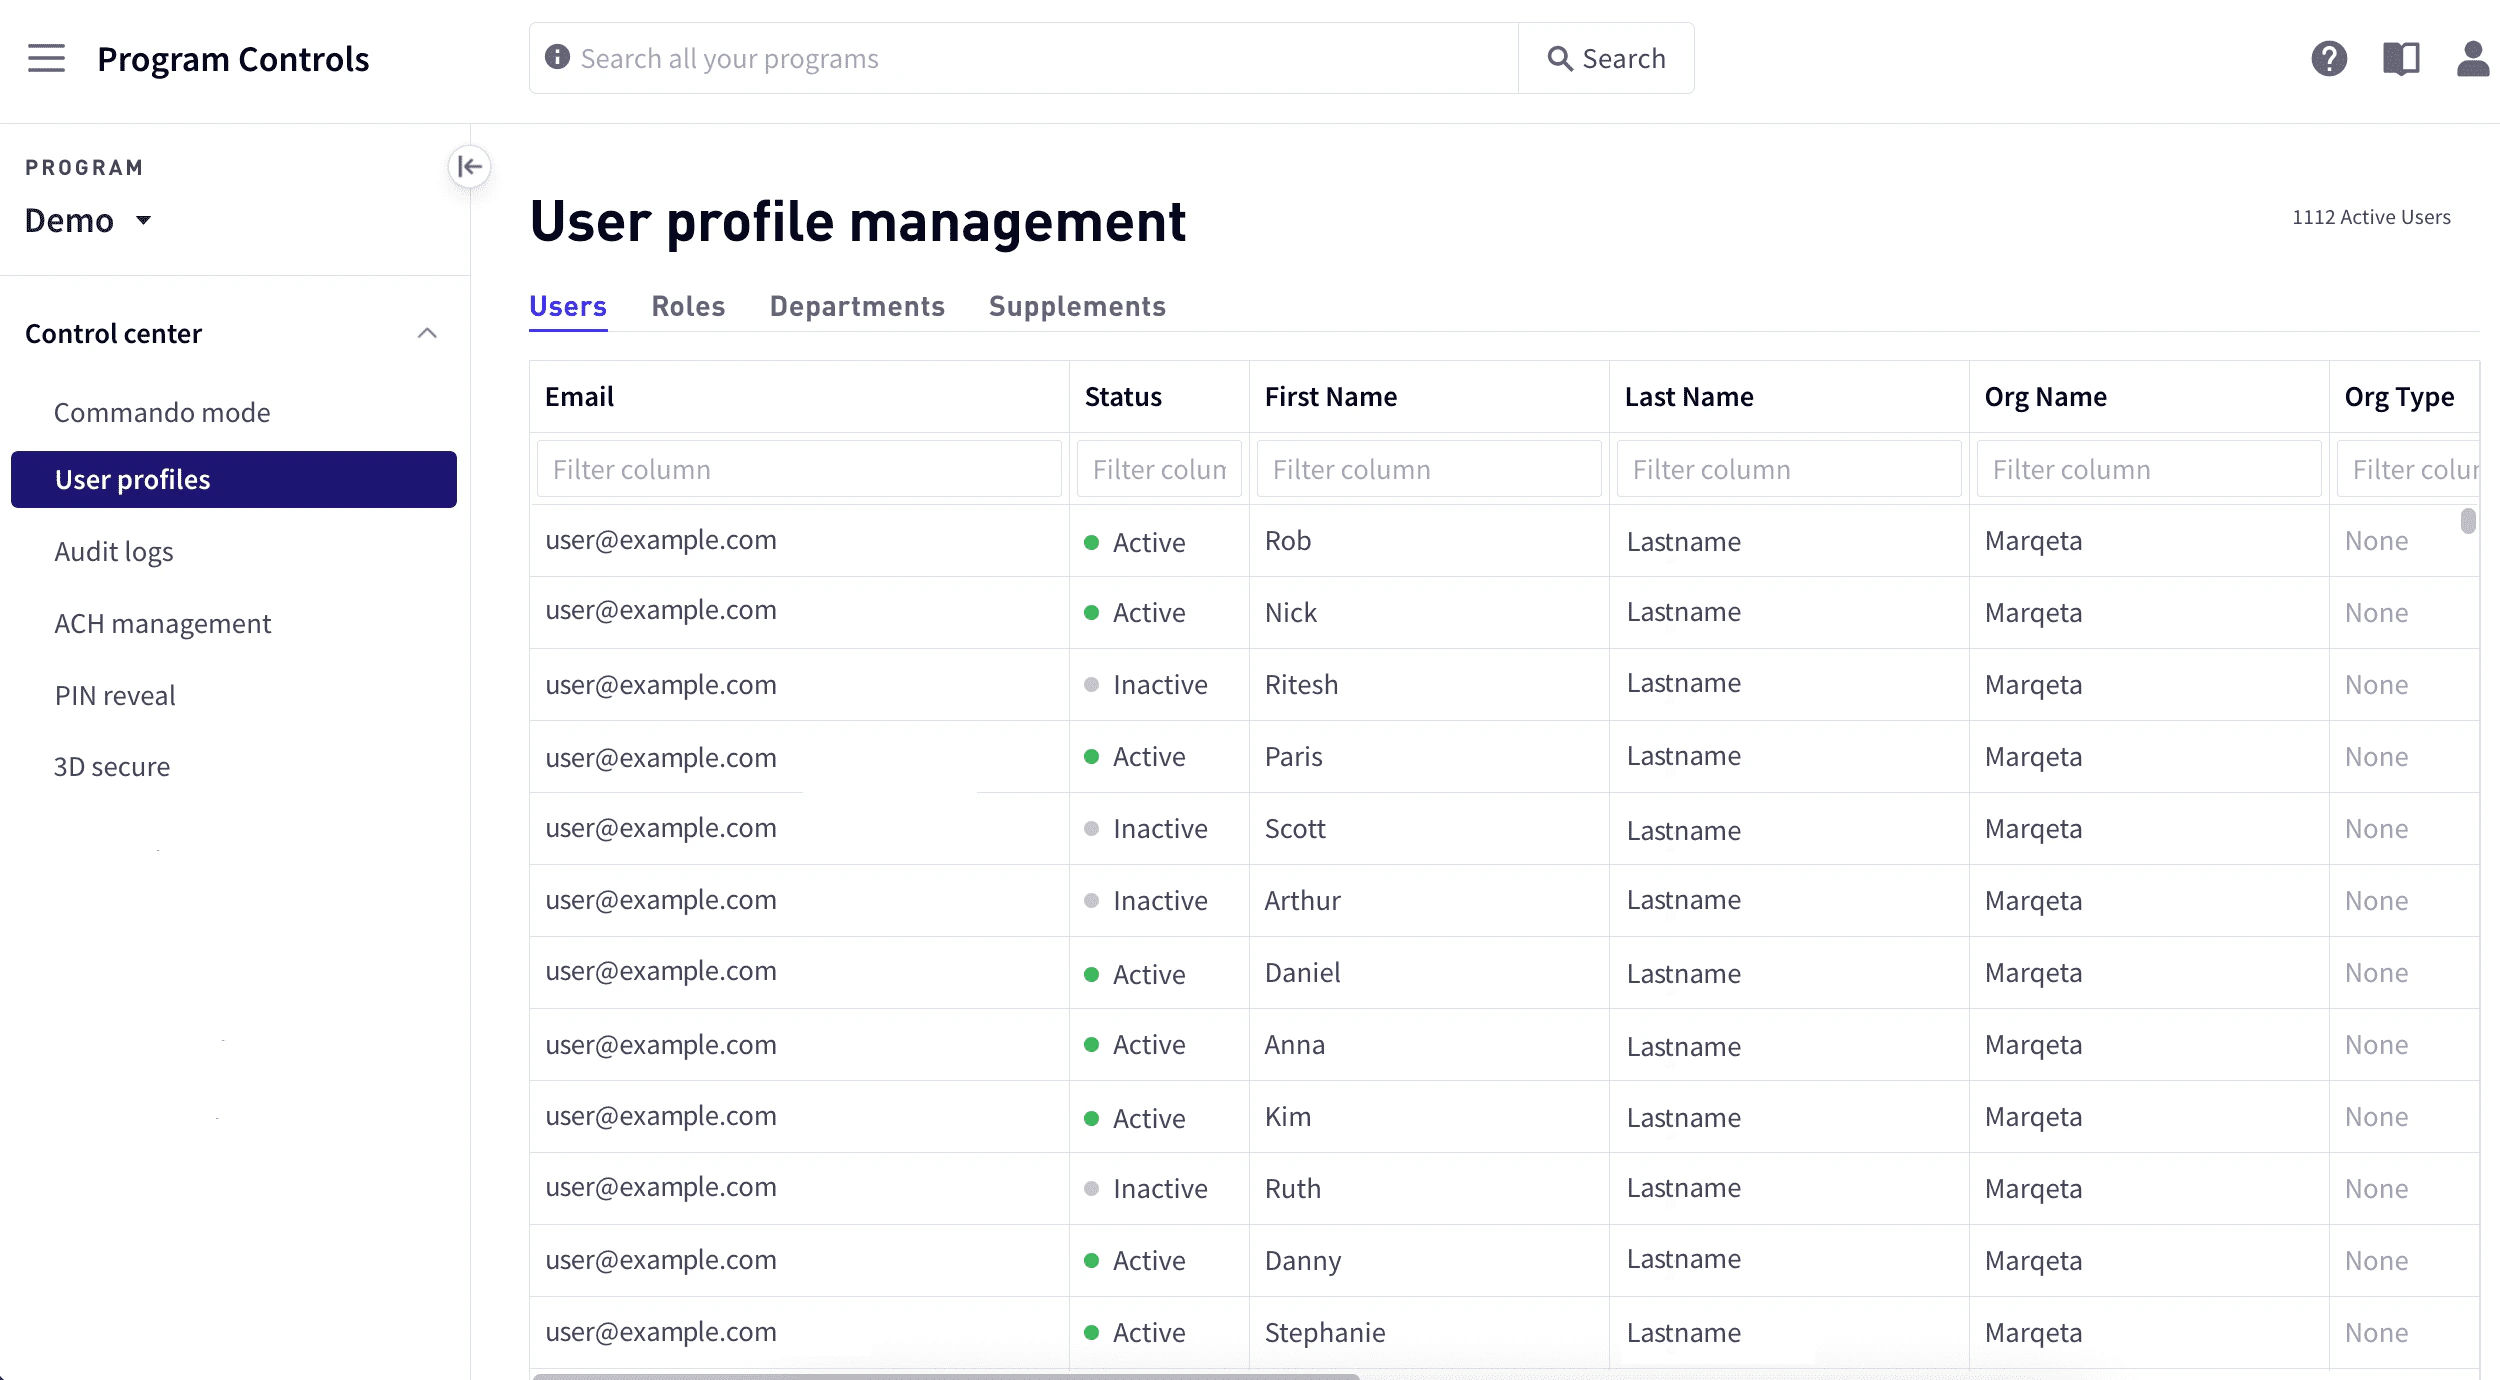
View user information
To view user information, go to Control center > User profiles. The Users tab lists current users along with the following information:| Column | Description |
|---|---|
| The user’s email address. An invitation to join is sent to this address. | |
| Status | The user’s status: Active or Disabled. |
| First Name | The user’s first name. |
| Last Name | The user’s last name. |
| Org Name | The user’s organization. |
| Org Type | The type of organization, such as Customer, Bank, or Card Network. |
| Programs | Programs whose information the user can view. |
| Role | The user’s role: Viewer or Admin. |
| Departments | The user’s department within in the organization. |
| Supplements | Supplemental level of data control for the user, if any: Detail or PII. |
| Date Created | The date when the user was added. |
| Date Updated | The most recent date when the user’s information was updated. |
Filtering by column
To filter rows by column, enter the sequence of letters you want to filter on in the text box at the top of the column. As you type, the matching rows are filtered dynamically.Adding users
To add a user:In the popup window, enter the user’s information. For Role, choose a one of the roles, as described in Roles below. For Department, choose one or more described in Departments below.
Note
By default, access to personally identifiable information (PII) is denied. Access can only be granted with accordance to your company and the issuing bank’s privacy and information security policies.If a user needs access to PII, submit a request to analytics@marqeta.com providing user information along with a brief but complete explanation of why PII access is needed. For example, “Customer service rep needs PII access to resolve customer KYC issues.” Users should be granted the lowest level of access required to fulfill their job responsibilities. If you have any questions, contact your Marqeta representative or send your question to analytics@marqeta.com.
By default, access to personally identifiable information (PII) is denied. Access can only be granted with accordance to your company and the issuing bank’s privacy and information security policies.If a user needs access to PII, submit a request to analytics@marqeta.com providing user information along with a brief but complete explanation of why PII access is needed. For example, “Customer service rep needs PII access to resolve customer KYC issues.” Users should be granted the lowest level of access required to fulfill their job responsibilities. If you have any questions, contact your Marqeta representative or send your question to analytics@marqeta.com.
Resending an invitation
To resend an invitation:Editing a user’s information
To edit a user’s information:In the User profile pane, update any of the user’s basic information, or add and remove programs, departments, roles, and supplements as necessary.
Enabling and disabling users
To enable or disable a user:Impersonating a user
If you have the Admin or Support role, you can impersonate some users, as described in Roles below. To impersonate another user:In the User profile pane, select View as <user_name>. The Dashboard as seen by the selected user is displayed, where you can act as that user.
Roles
Roles define the privileges that are available to dashboard users. Users can be assigned the following roles:| Column | Description |
|---|---|
| Admin | Can create and modify Viewer and Support accounts with the same domain names as their own, revoke their credentials, impersonate users that they have provisioned, and view reports. |
| Support | Can view reports and impersonate other users with the Viewer privilege in the same program as their own. |
| Viewer | Can only view reports. |
Departments
The Departments reflect the organization for a typical business. You can assign one or more departments to a user. The following departments are available:| Column | Description |
|---|---|
| Analytics | (Read only) Works with data to interpret patterns and trends to improve business decision-making, reduce fraud, and provide deeper business insights. |
| Business Development | (Read only) Creates long-term value by interpreting markets, customers, and business relationships. |
| Compliance | (Read only) Ensures that the organization complies with applicable laws and regulations, helping preserve the organization’s integrity and reputation. |
| Compliance - Processor Only | An external role for users responsible for managing transaction disputes at Powered By customers. |
| Compliance - Program Managed | An external role for users responsible for managing transaction disputes at Managed By customers. |
| Customer Service | Responsible for assisting users with a range of issues that may include suspending accounts, updating billing information, initiating user disputes. Assists customers in making effective use of company products. |
| Customer Success | (Read only) Proactively ensures that customers successfully and efficiently use the company’s products. |
| Engineering | (Developer) Researches, designs, and implements the technical development of financial products. |
| Finance — Other | Manages company finances, including financial planning, auditing, accounting, and produces financial statements. |
| Finance — Settlement | Ensures that funds transferred between the merchant’s and the card user’s bank are successfully concluded. Additionally, the Settlement team reconciles the daily drawdowns from card networks to internal data to ensure appropriate funds movement and identifies exceptions in internal transactional data. |
| General | (Read only) Business activities that do not fall within a specific business department. |
| Human Resources | (Read only) Responsible for employee well-being, including payroll, benefits, hiring, firing, and staying up to date with tax laws. |
| Legal | (Read only) Provides legal advice on business issues, drafting commercial agreements, ensuring the company complies with applicable laws and regulations, and prepares required legal documents. |
| Marketing | (Read only) Researches markets and potential customers, promotes the company business, and drives sales of company products and services. |
| Operations | Manages the strategic and day-to-day production of products and the delivery of services. |
| Product Management | (Read only) Manages a product through all stages of the product lifecycle, including the people and processes required to produce the product or service. |
| Program Management | (Read only) Manages several projects with the intention of coordinating diverse efforts and improving the company’s performance. |
| QA | (Developer) Tests company products and services in order to prevent errors and defects. |
| Sales | (Read only) Sells company products by building relationships with customers, matching them with the company’s products and services, and providing a direct link between the company’s product or service and its customers. |
Sandbox management
Note
The sandbox is available for users who have signed up for developer access. For information on signing up as a developer, contact your Marqeta representative.
The sandbox is available for users who have signed up for developer access. For information on signing up as a developer, contact your Marqeta representative.
- Go to Program Controls > Control center > Sandbox management.
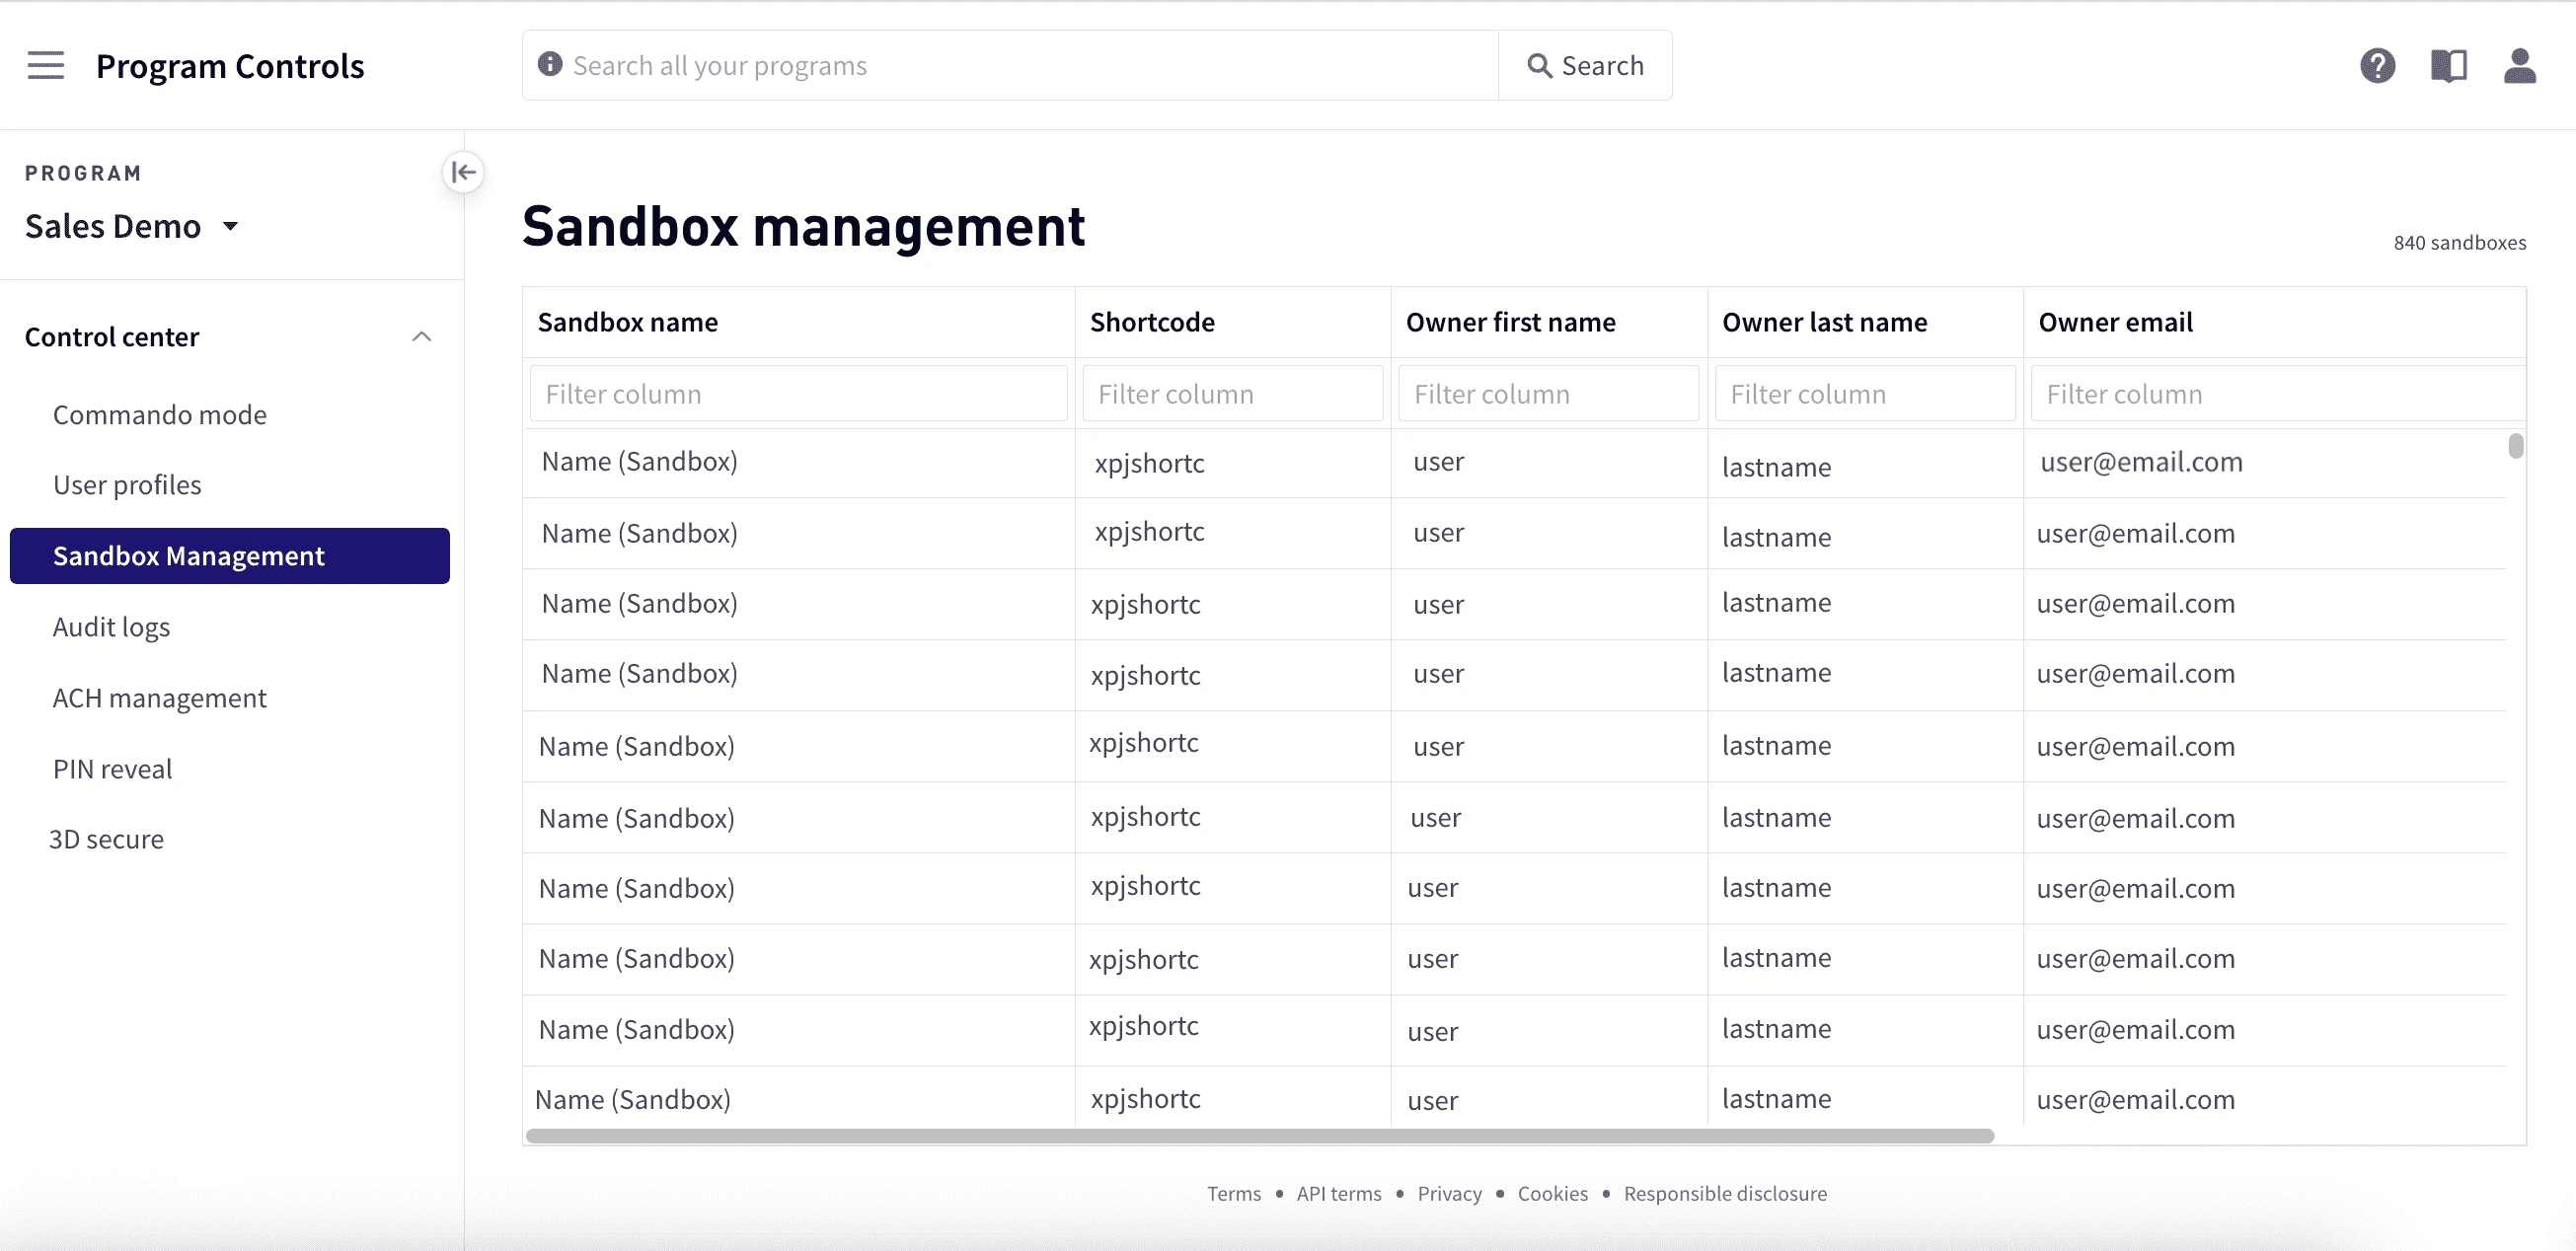
| Column | Description |
|---|---|
| Sandbox name | Name of the sandbox. |
| Shortcode | Sandbox short code. |
| Owner first name | Sandbox owner’s first name. |
| Owner last name | Sandbox owner’s last name. |
| Owner email | Sandbox owner’s email address. |
| Date created | Date and time when the sandbox was created. |
| Date updated | Date and time when the sandbox was last updated. |
Audit logs
As information is modified on the Marqeta platform, such as server names, user names, actions are performed, and data updated, these changes are captured and logged to Marqeta’s central logging service. Audit Logs provides a view of these logs to help you trace the details of these actions. To view audit logs, go to Program Controls > Control center > Audit logs. Audit log records are listed, and include the following information:| Column | Description |
|---|---|
| id | Automatically assigned unique ID for the action. |
| User Name | The user performing the action. |
| App Name | The application that logged the action, such as the Marqeta Dashboard or GraphQL. |
| Record id | The record id associated with the call, if any. |
| Record Operation | The name of the query or mutation (in the case of GraphQL) or rails action (index, show, create, update, or destroy). |
| Record Type | The primary business object operated on, such as user or business. |
| Program | The program short code. |
| Created Time | The time when the action was created. |
| Remote ip Address | The remote IP address where the action was generated. |
| User Role | The list of roles for the user performing the action. |
| Http Status Code | The status code returned by the action. |
| Http Params | The parameters associated with the request, such as {"first_name":"test","last_name":"test"}. |
| Event Type | The type of event, such as http_request or graphql_request. |
| App Server Name | The application server that generated the action. |
| Http Path | The HTTP path, such as /changepassword or /businesses/search. |
| Http Method | The http method, such as PUT or POST. |
| Old Value | The value before the action. |
| New Value | The value after the action. |
| Notes | Notes related to the action, if any. |
| Extra Info | Additional information about the action, if any. |
ACH management
Use ACH management to enable direct deposit for an account. To enable direct deposit:PIN Reveal
Using PIN Reveal you can display a cardholder’s forgotten PIN to them via your mobile application. With PIN Reveal, the online PIN is less likely to fall out of sync with the PIN stored on the chip because cardholders can reveal their existing PIN instead of resetting it to a new value. Revealing a cardholder’s PIN requires compliance with PCI DSS data security requirements. If you are not PCI certified, use Marqeta’s UX Toolkit to reveal card details to the cardholder and copy these values to the clipboard for later use. You can also view the cardholder’s PIN.Enabling PIN reveal
You must first request that Marqeta enable this feature for your program, then explicitly provision PIN Reveal for the program. To provision PIN reveal:
Opt in Status shows the current status for the program. Possible values are Disabled, Pending program approval, or Program approved.
Viewing PIN Reveal history
PIN Reveal displays the three most recent events in the upper-right. To view a complete PIN Reveal history for the current program, select View full history.3D Secure
3D Secure allows you to provide your customers with an added layer of protection against fraudulent online credit and debit card transactions. Supported by most card issuers, 3D Secure requires cardholders to complete an additional verification step with the issuer before a transaction is authorized. By enabling 3D Secure, you can decrease the number of disputed transactions. 3D Secure boosts customers’ confidence and helps you establish greater trust with them. For more information on 3D Secure, see About 3D Secure. Your customers will verify their transactions using a secure code sent by SMS or email. You can provide a customer support number your customers can call if they have questions or concerns about 3D Secure.Enabling 3D Secure
Your customers will use a one-time passcode (OTP) to verify their transactions, which requires them to enter a secure code sent by SMS or email.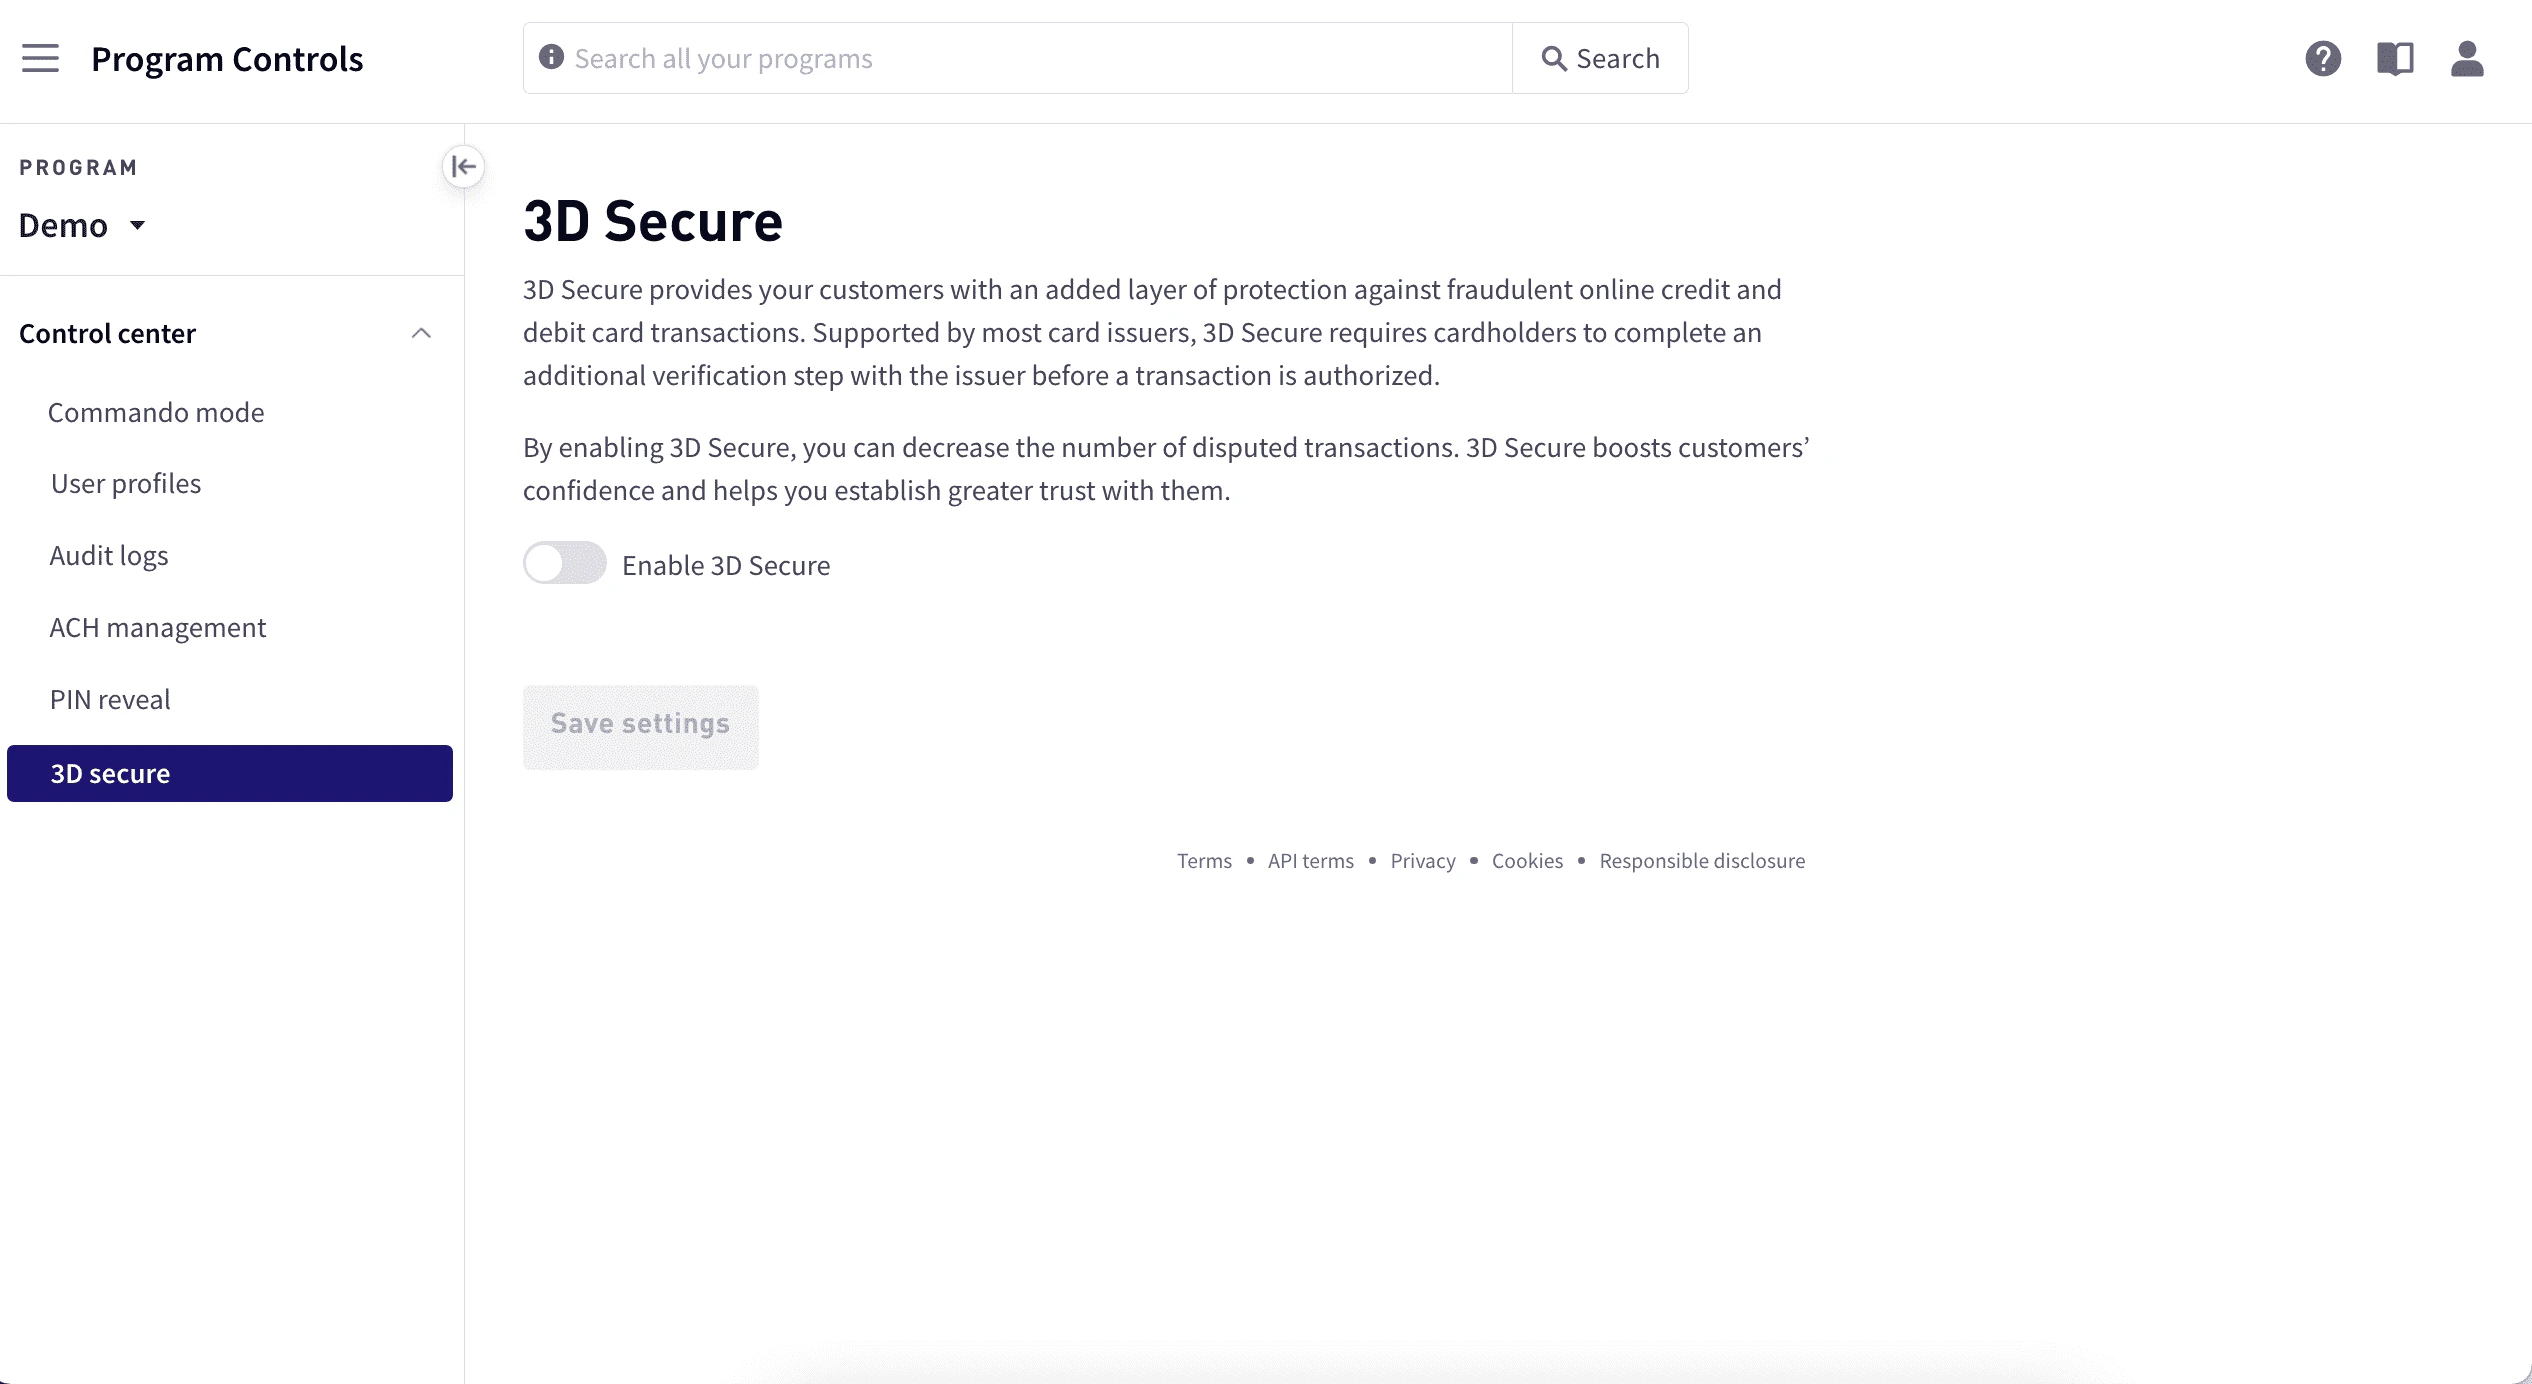
Select the messages versions to support for this program. Support for v1.0.2 is required. You can add additional versions to support. Enabling support for versions other than v1.0.2 provides heightened protection against fraudulent transactions, but requires additional integration work to set up. Support of v2.2.0 is for Visa programs only.
To provide a customer support number for your customers to call if they have questions or concerns about 3D Secure, enter a complete number including area code.
If you want to provide a no-reply email address, enter an unmonitored email address such as noreply@yourdomain.com from the domain your customers typically associate with your brand. If none is provided, noreply@marqeta.com will be used. A verification link will be sent to this address during initial setup.
3D Secure Decision and Result services
Enable this pair of services to allow Marqeta to manage 3DS strong customer authentication (SCA) decisions for your program.3D Secure Decision service
The 3D Secure Decision Service enables you to configure and implement Marqeta’s 3D Secure decision-making policy instead of developing or hosting your own solution. 3D Secure Decision Service rules determine whether the system applies SCA to an incoming transaction authentication request or exempts it. Enabling this service strikes a balance between your customers’ frictionless experience and the risk of fraud.3D Secure Result service
The 3D Secure Results Service is used to trigger the Marqeta platform to update the result of the cardholder’s SCA challenge. It informs the 3D Secure Decision Service whether or not the strong customer authentication (SCA) has succeeded, which is required to score future transactions by this cardholder more accurately. To enable 3D Secure Decision and Result services, configure your program attributes by providing a URL and login credentials:For 3D Secure Decision service program attributes, enter the fully qualified domain name (FQDN) of the endpoint where you want event notifications to be sent, for example https://www.yourdomain.com/webhook. The URL cannot exceed 200 characters in length.
Enter the username associated with the user authorized to access the endpoint specified in the Endpoint URL field. The username cannot exceed 500 characters in length.
Enter a password for the username used to access the endpoint specified by the Endpoint URL field. The password you choose must be between 8 and 500 characters in length.
Advanced authentication service
Enable Advanced authentication services to allow Marqeta to manage 3DS strong customer authentication (SCA) decisions for your program.Enter the fully qualified domain name (FQDN) of the endpoint where you want event notifications to be sent, for example https://www.yourdomain.com/webhook. The URL cannot exceed 200 characters in length.
Enter the username associated with the user authorized to access the endpoint specified in the Endpoint URL field. The username cannot exceed 500 characters in length.
Developer tools
If you have signed up as a developer, the Dashboard provides tools for integrating with the Marqeta platform so that you can:- Get API keys for your public sandbox.
- View a transaction’s history.
- Manage your webhooks.