/
15 minute read
June 2, 2023

Dashboard Overview and Quick Start

Welcome to the Marqeta Dashboard. The Dashboard provides an interactive user interface for exploring, administering, and managing your card and payment programs on the Marqeta platform. Using the Dashboard, you can accomplish tasks such as:

  • Explore your card program data by generating reports and visualizations, including custom reports that you can use to better understand your business.

  • Manage your users, cards, and businesses, including tasks such as replacing a card, reporting a card stolen, or initiating a dispute.

  • Create cards individually or in bulk.

  • Access developer tools for integrating with the Marqeta platform.

  • View audit logs.

  • Enable ACH Direct Deposit.

  • Enable 3D Secure authentication and PIN Reveal.

  • Manage Dashboard users by controlling access, viewing and editing user information, adding users, and defining roles.

Access the Marqeta Dashboard

To access the Marqeta Dashboard, go to app.marqeta.com in your browser. In the login window:

  • If you have an existing account, enter your username and password and select Sign In.

  • If you do not have an account, request access to a live Marqeta Dashboard program by contacting your organization’s administrator or your Marqeta Customer Success Representative.

Warning
After five unsuccessful login attempts, you will be locked out of your account for one hour. Some Dashboard features require that you have the specific supplement for that feature granted by an administrator.

About the Marqeta Dashboard

The Marqeta Dashboard provides these main areas of functionality:

Home

View a summary of your program’s activity over the last day, week, or month, and provides links to saved reports.

Reports

Explore your production data on the Marqeta platform. Reports aggregate and curate your data to help you make data-driven business decisions.

Card Management

Issue your card products individually or in bulk.

Customers

Manage card users and businesses.

RiskControl

Manage transaction disputes.

Credit programs

Create and manage your credit products.

Control center

Manage access to the Dashboard, manage users and roles, control Commando Mode, view audit loges, manage ACH, enable PIN Reveal and 3D Secure, and create card products.

To start exploring the Marqeta Dashboard, use the content switcher in the upper-left corner and the sidebar on the left to navigate through the main functional areas.

View a summary of program activity

Home displays your program’s activity for the last day, week, or month; you can also find links to saved reports here:

Home

Is this helpful?

Yes
No

To view a summary of your program activity, select Dashboard in the upper-left corner, then select Home from the sidebar. For details, see Home.

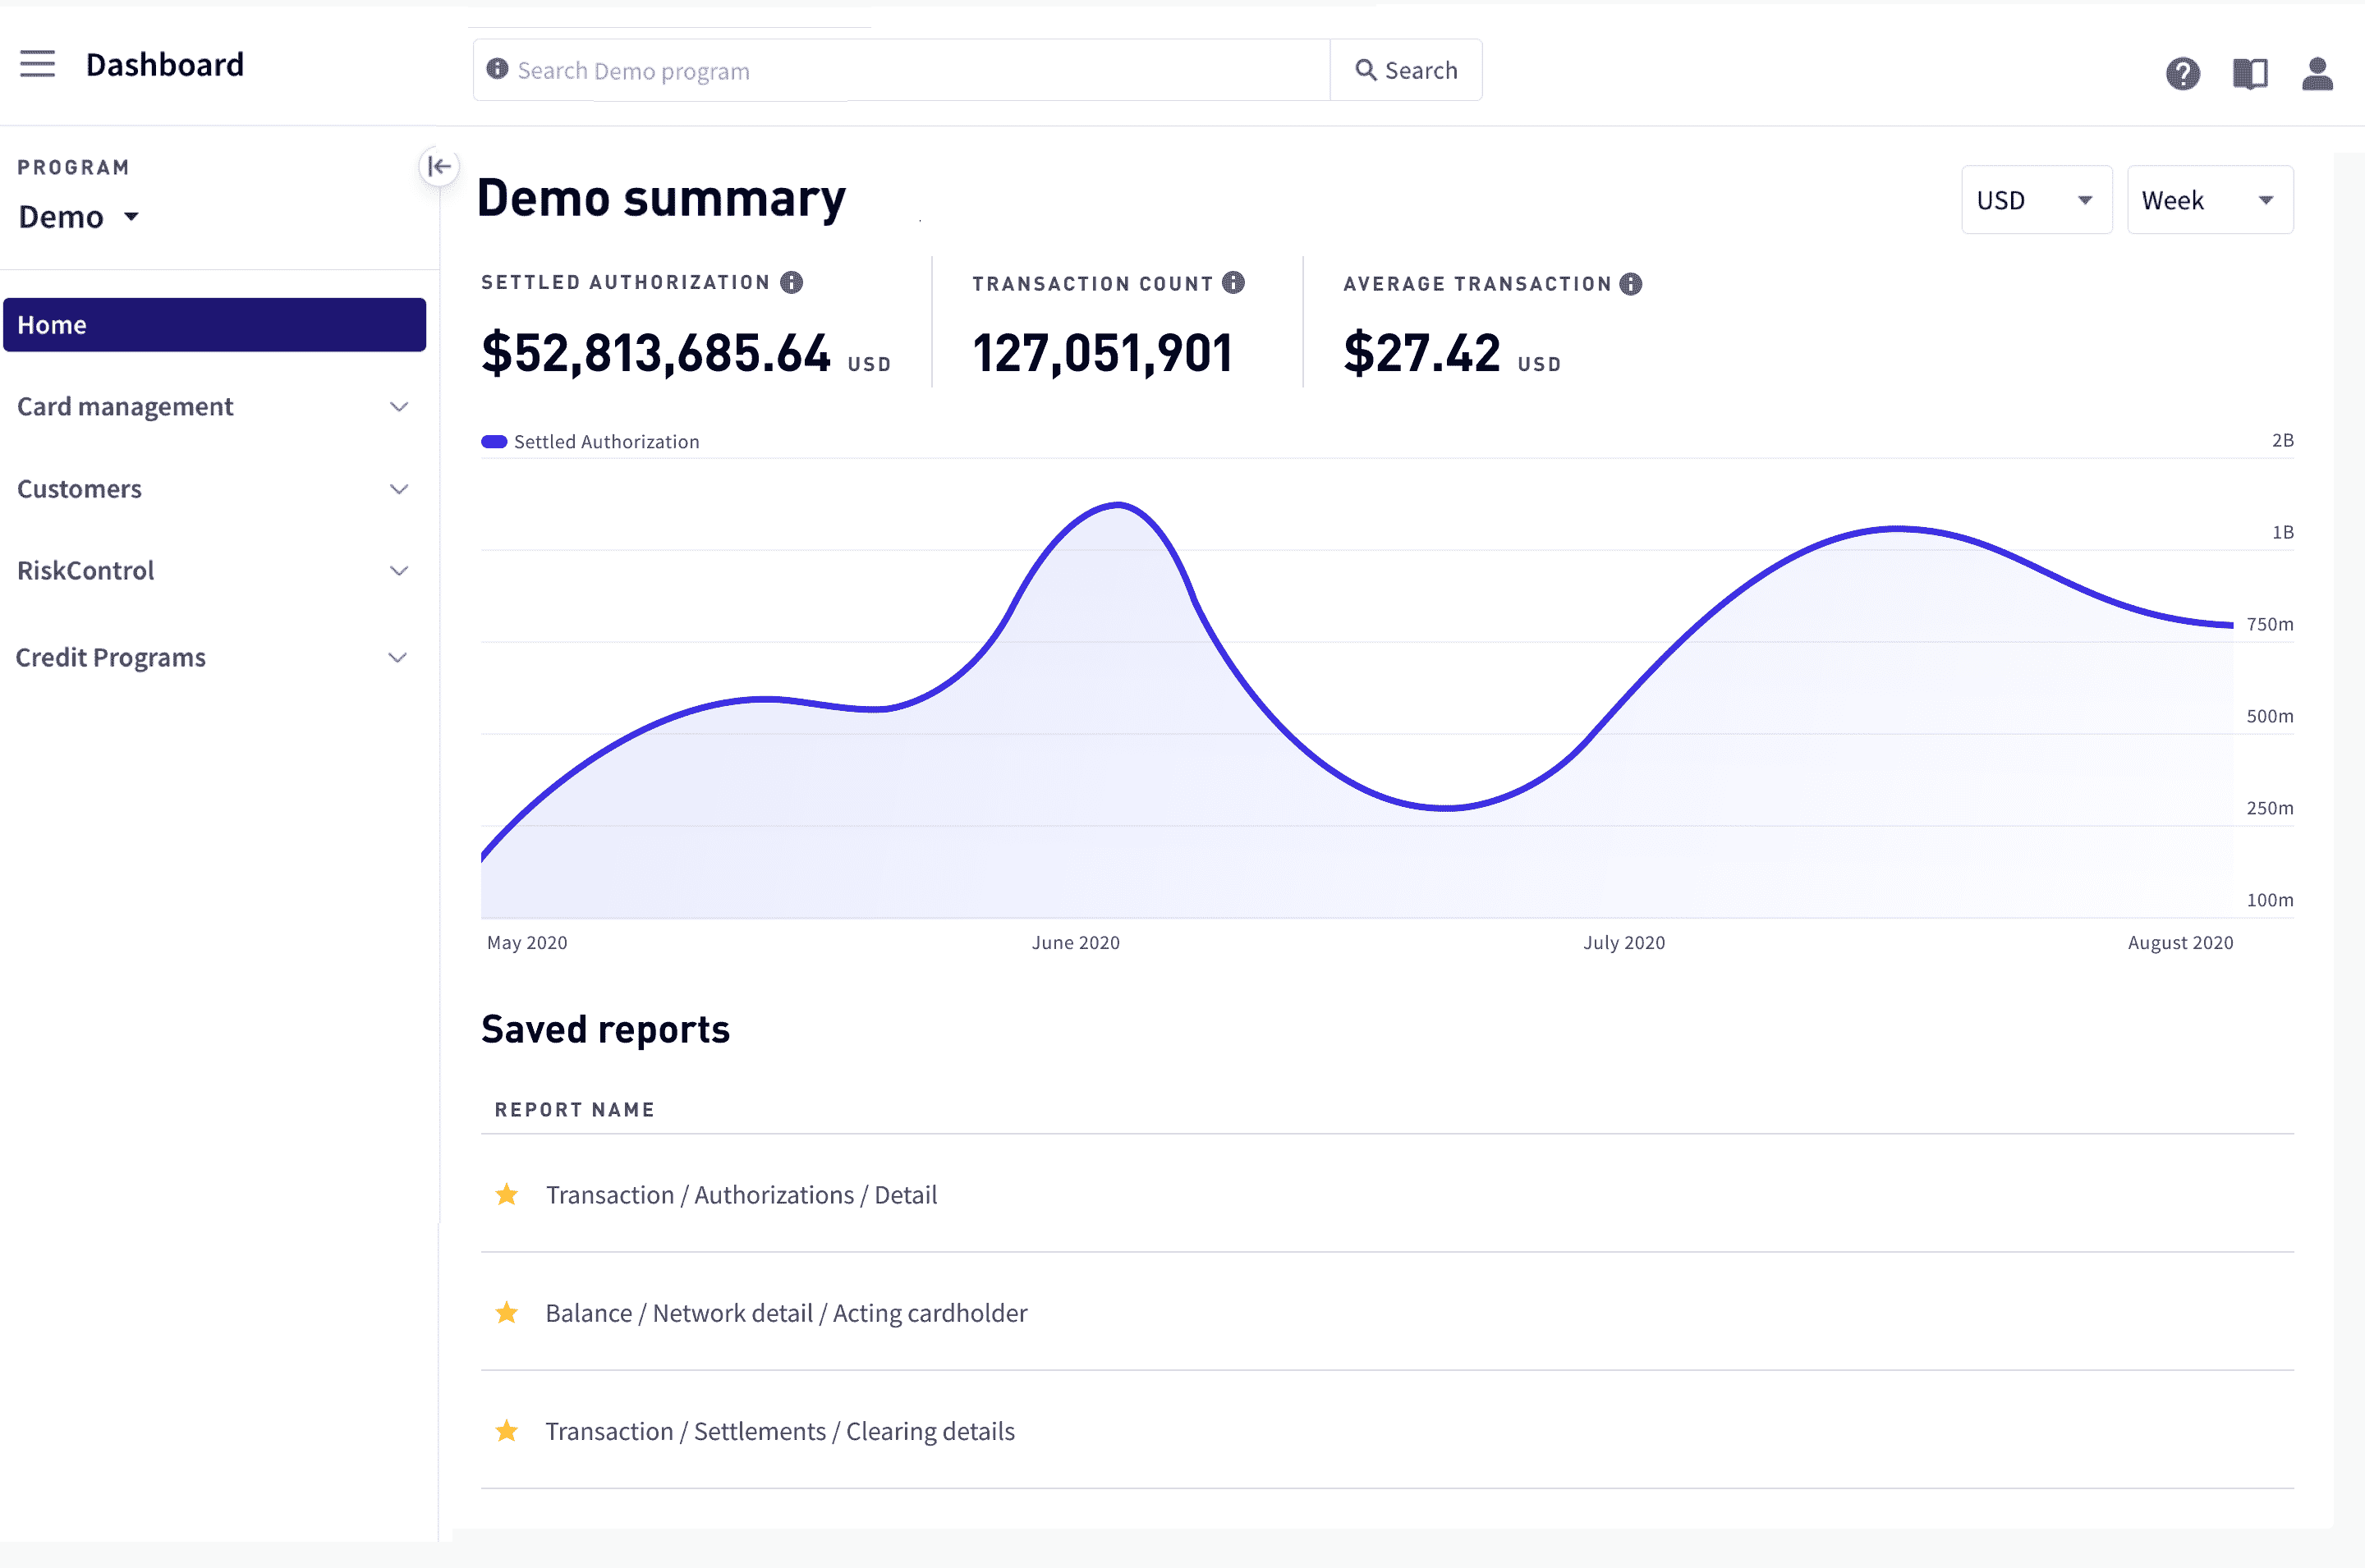
Generate reports and create visualizations

Use Reports to explore your data on the Marqeta platform. Reports aggregate and curate your data to help you make data-driven business decisions. You can generate reports on your business, such as the number of authorizations or declines, and filter and sort the data.
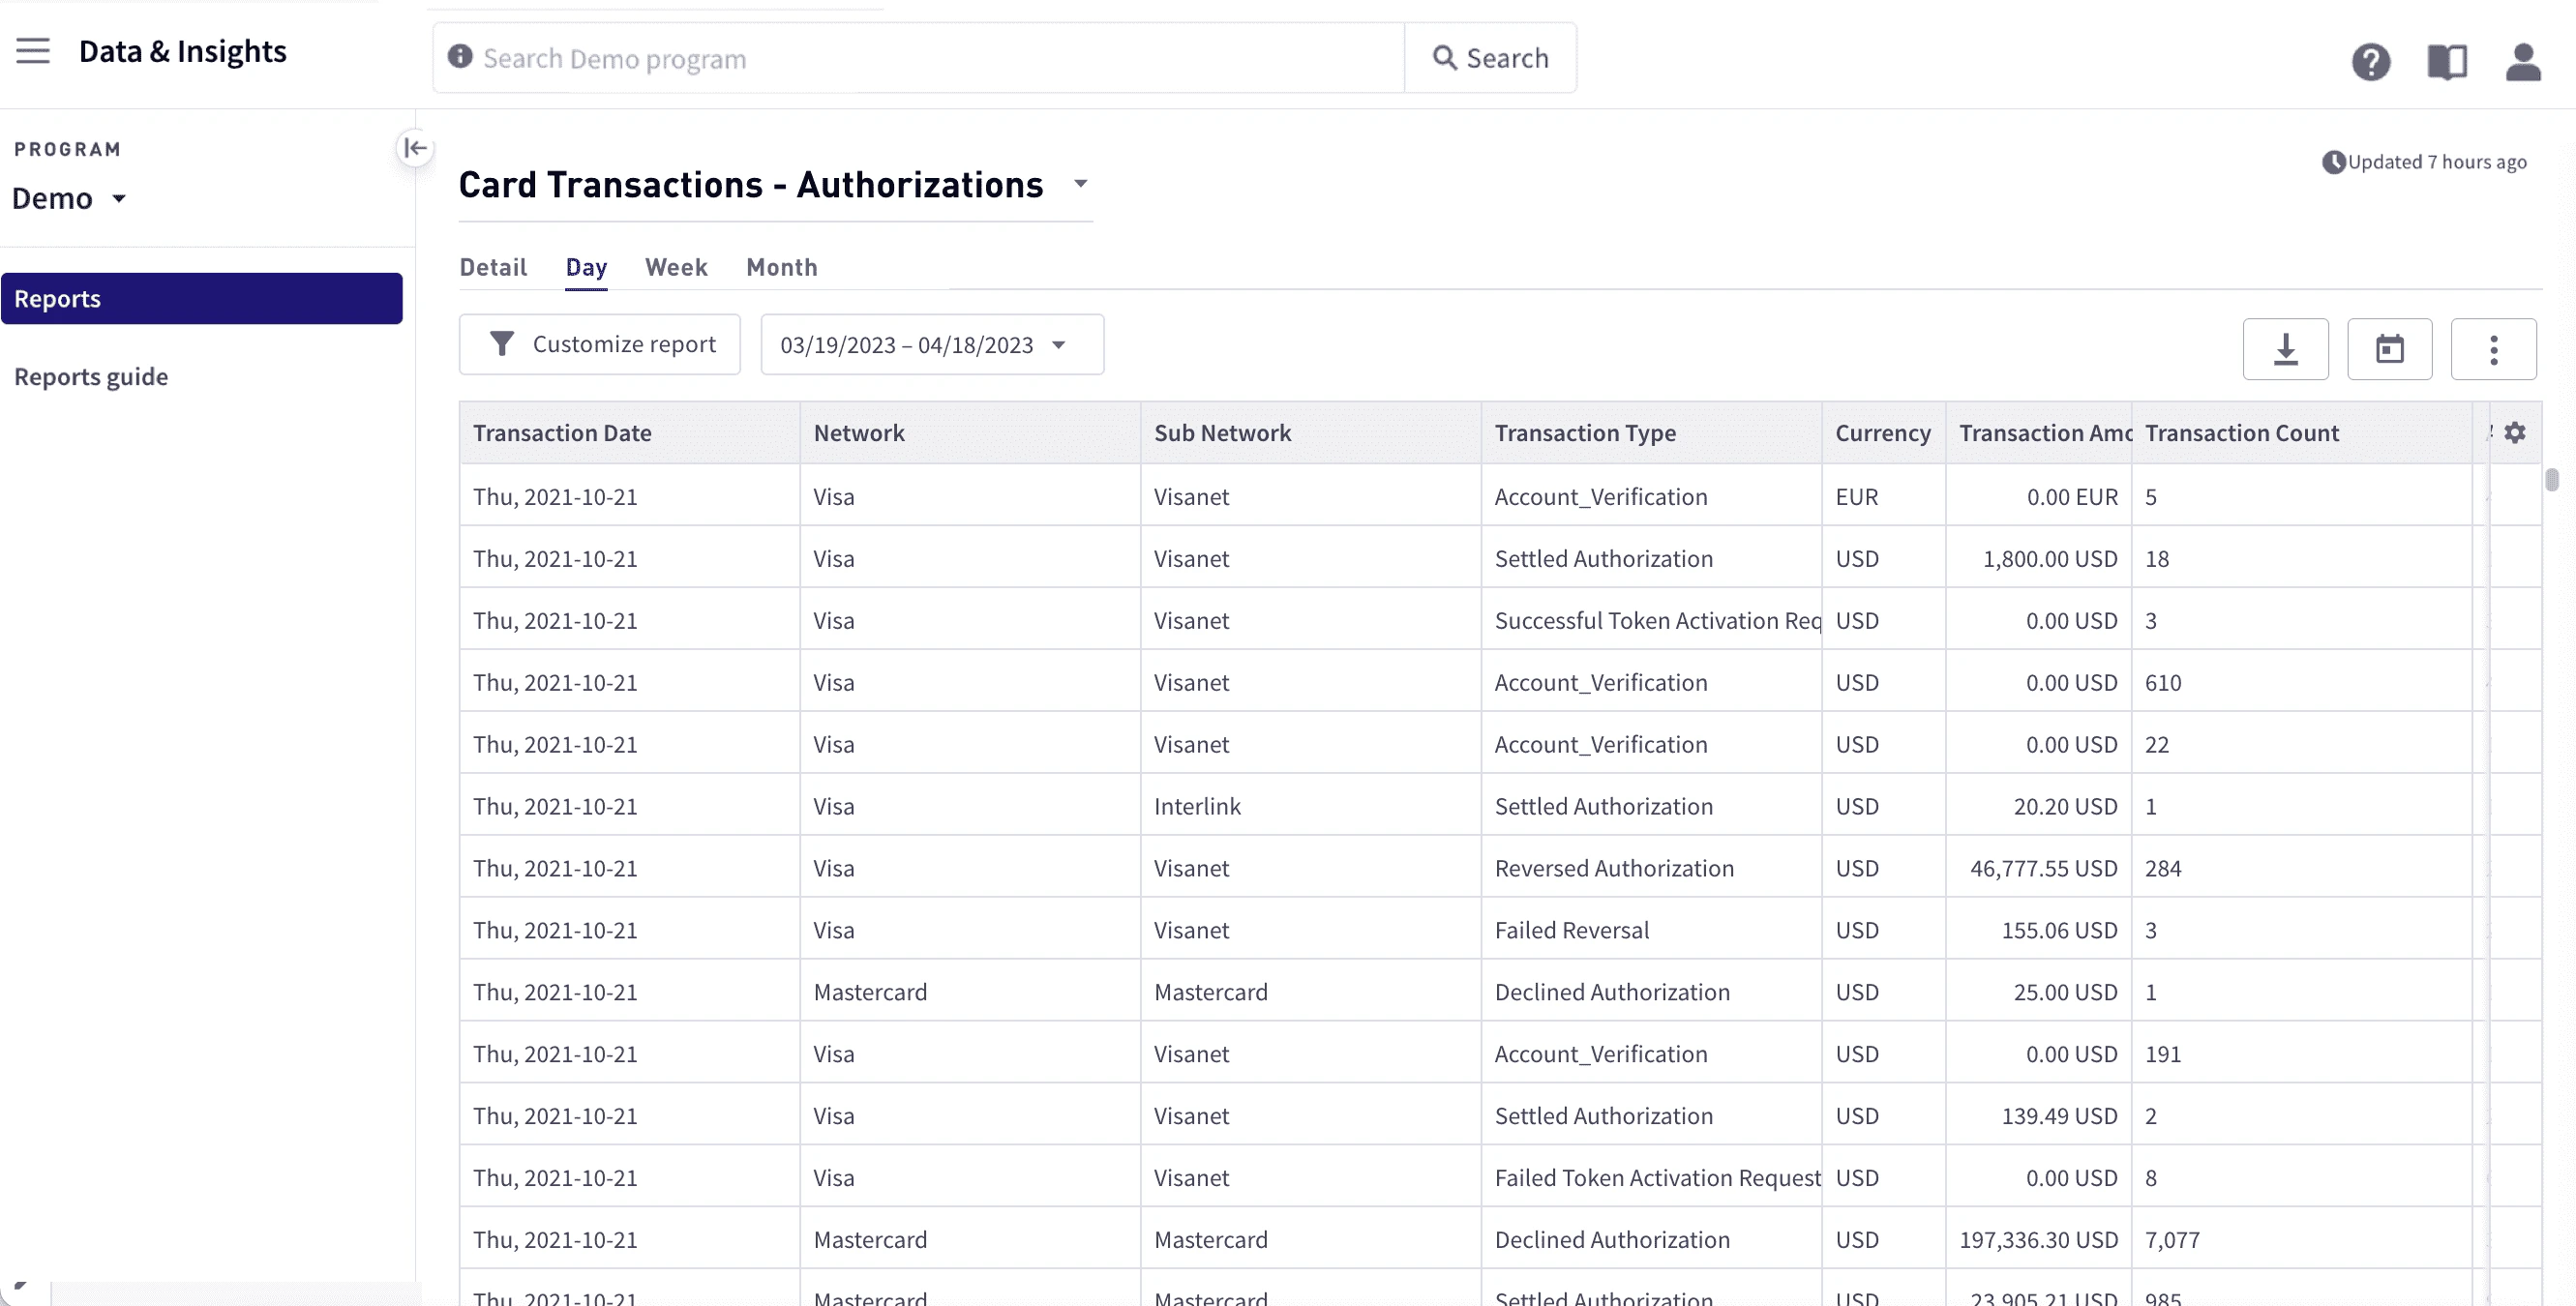
Reports

Is this helpful?

Yes
No

You can create visualizations, such as bar charts or scatter plots, to help you to identify patterns and trends.

You can save reports and visualizations you define for easy access to your ongoing enterprise. To view the reports and create your own reports, select Data & Insights in the upper-left corner, then select Reports from the sidebar. For details on how to create and interpret reports, see Reports in the Dashboard.

Manage your card programs

Use Card Management to manage your card products.

Cards

Is this helpful?

Yes
No

Using Card Management, you can view all of the card products configured for your program, and:

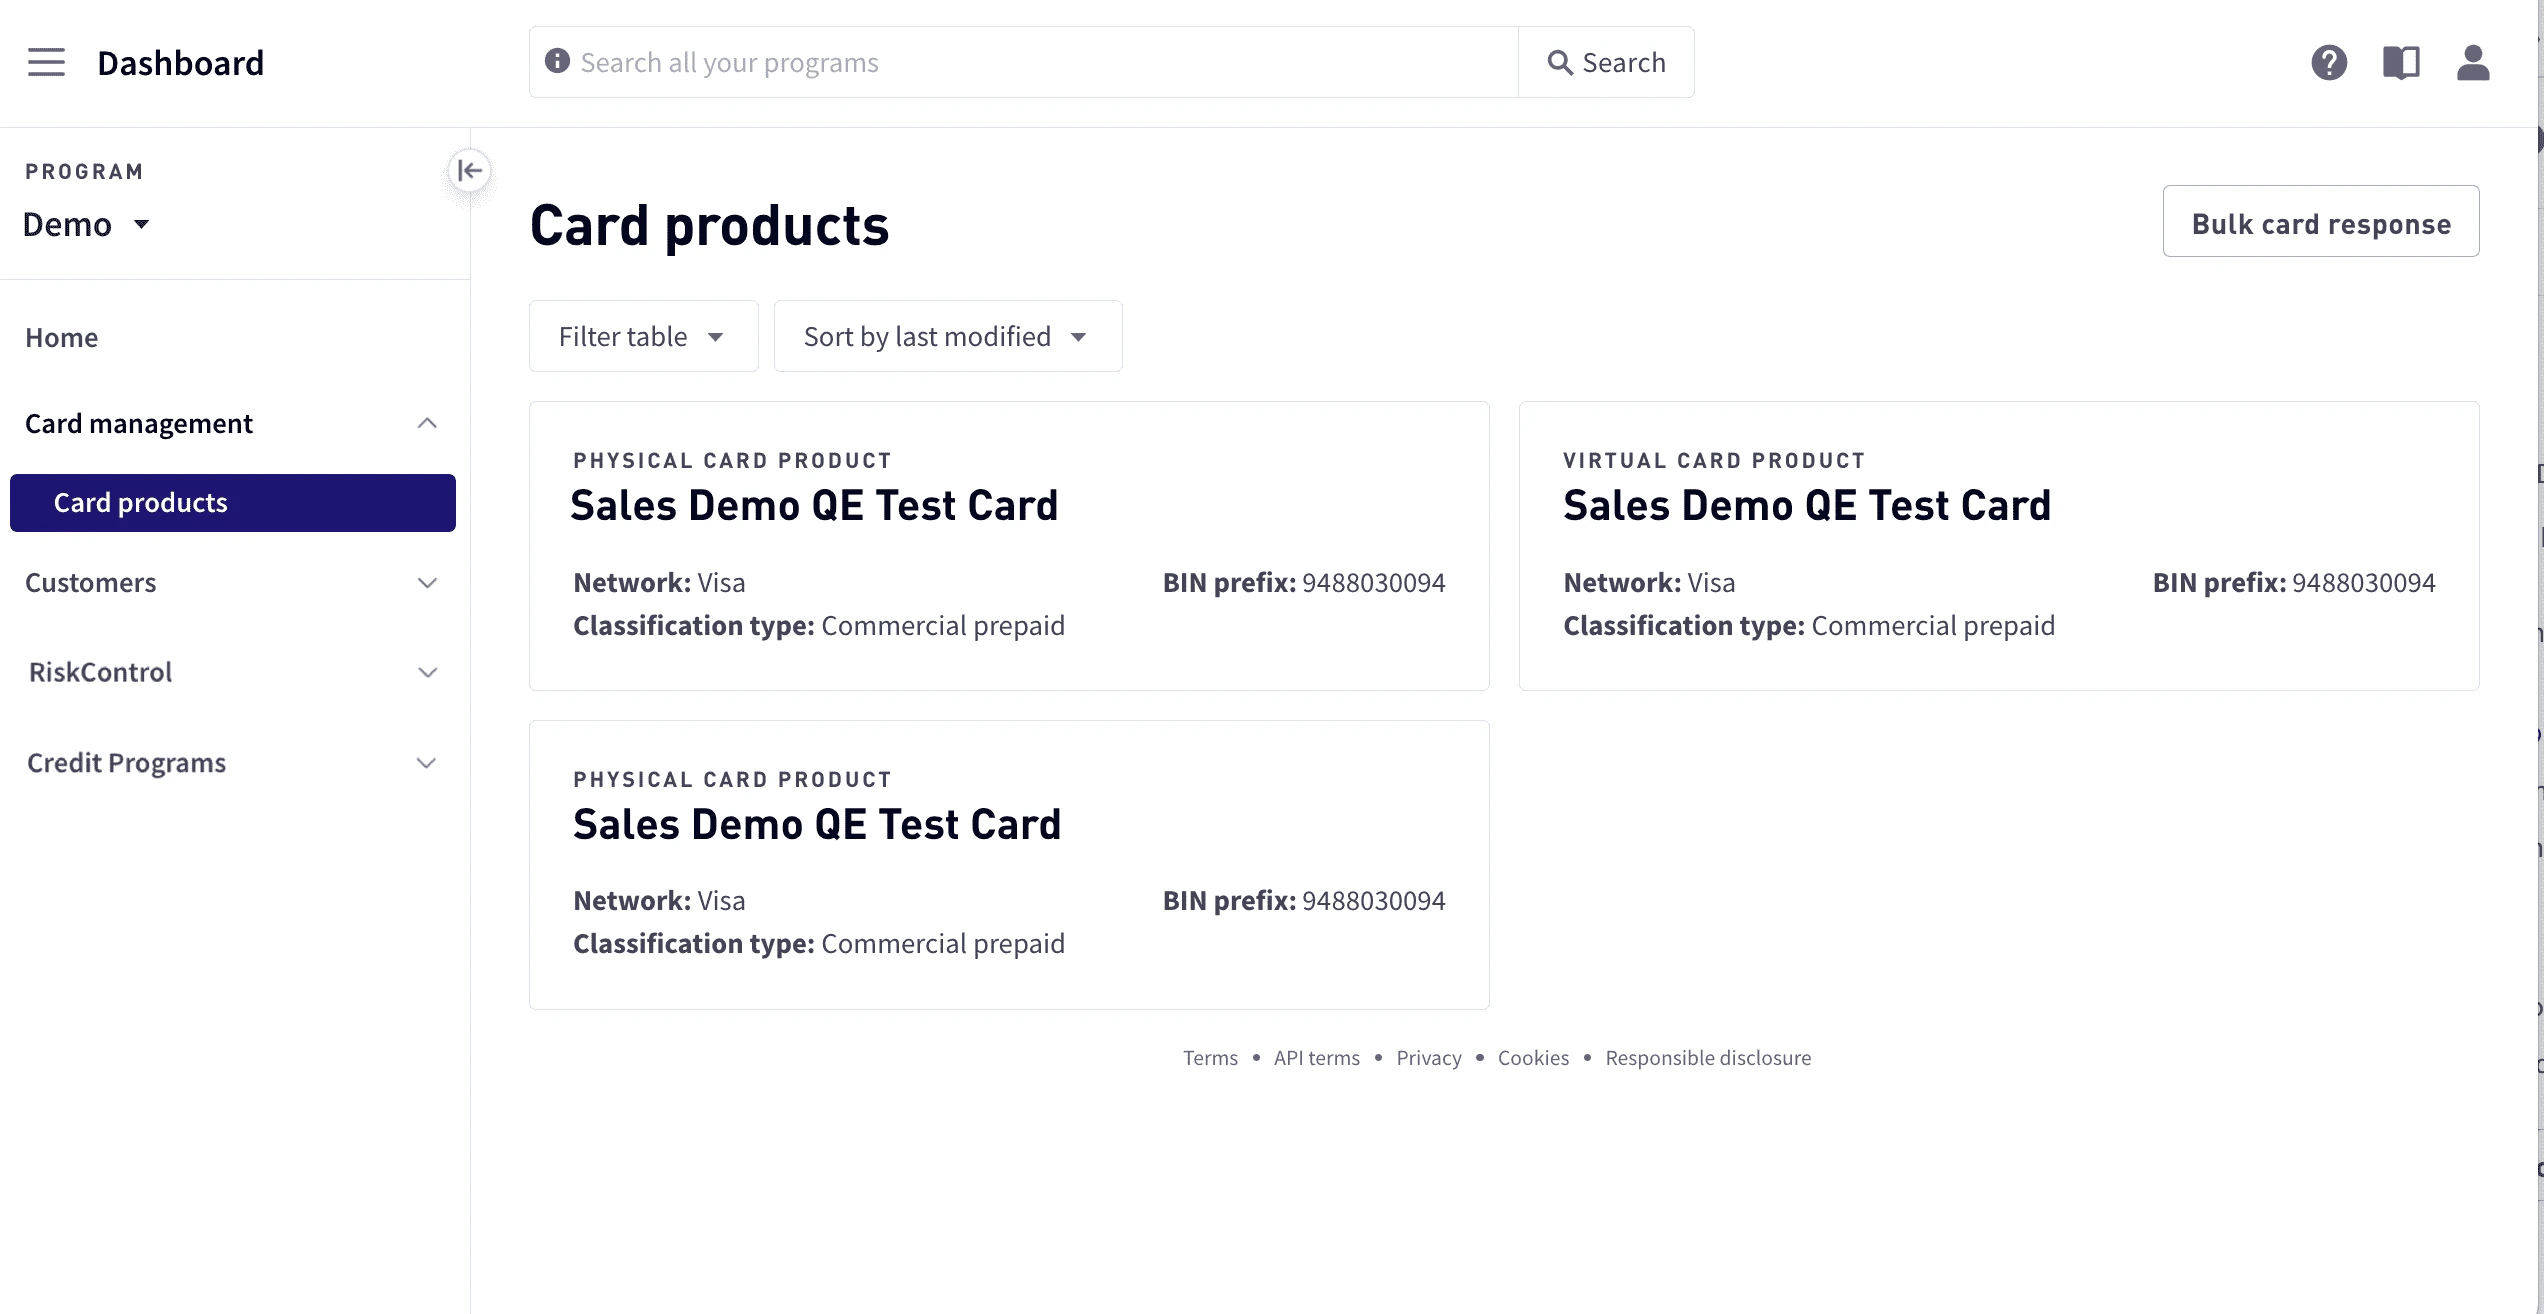
  • View all configured card products (virtual and physical) and relevant information.

  • Order cards from existing card products (both single or in bulk).

  • View the results of bulk card ordering file uploads.

To manage your card programs, select Dashboard in the upper-left corner, then select Card management from the sidebar. For detailed information on how to manage your programs, including step-by-step procedures, see Managing Cards in the Dashboard.

Manage your customers

Use Customers to manage your users and businesses.

Users

Is this helpful?

Yes
No

Using Customers you can manage users, cards, and businesses, including:

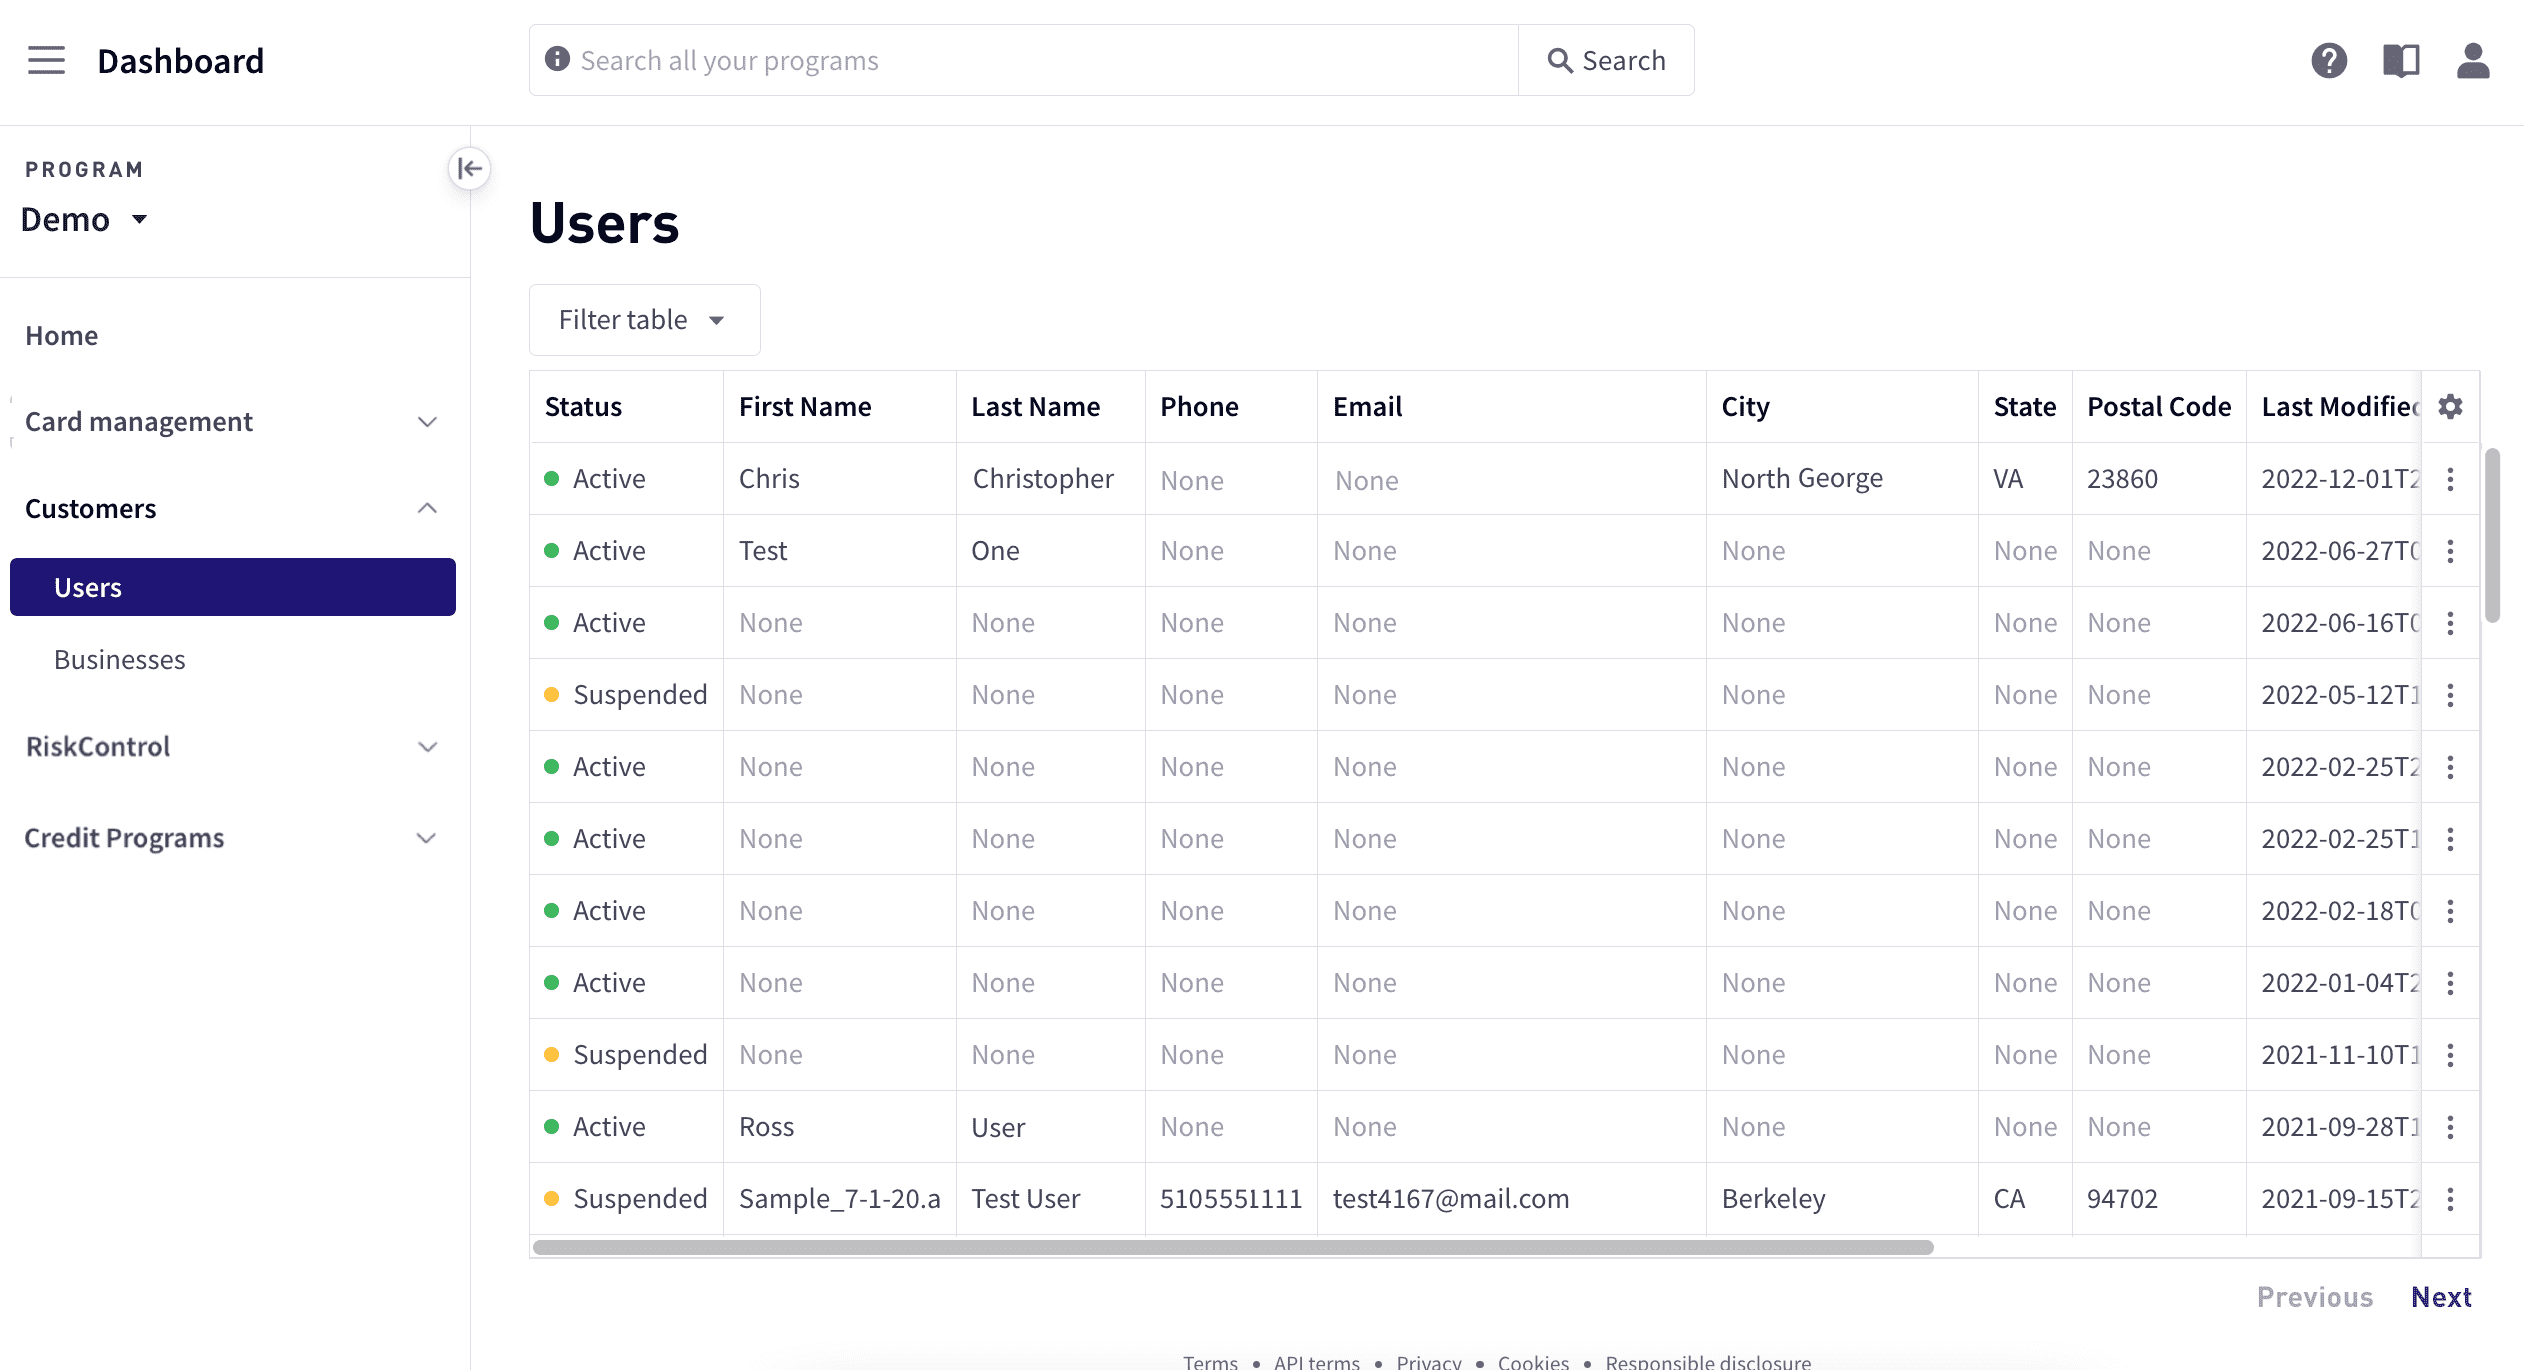
  • Manage user and business information.

  • Change user and business status.

  • Access customer and business cards.

To manage customers, select select Dashboard in the upper-left corner, then Customers > Users or Customers > Businesses from the sidebar. For detailed information, including step-by-step procedures, see Managing Customers in the Dashboard.

Manage transaction disputes (beta)

Marqeta enables you to manage the dispute process using the Marqeta Dashboard.
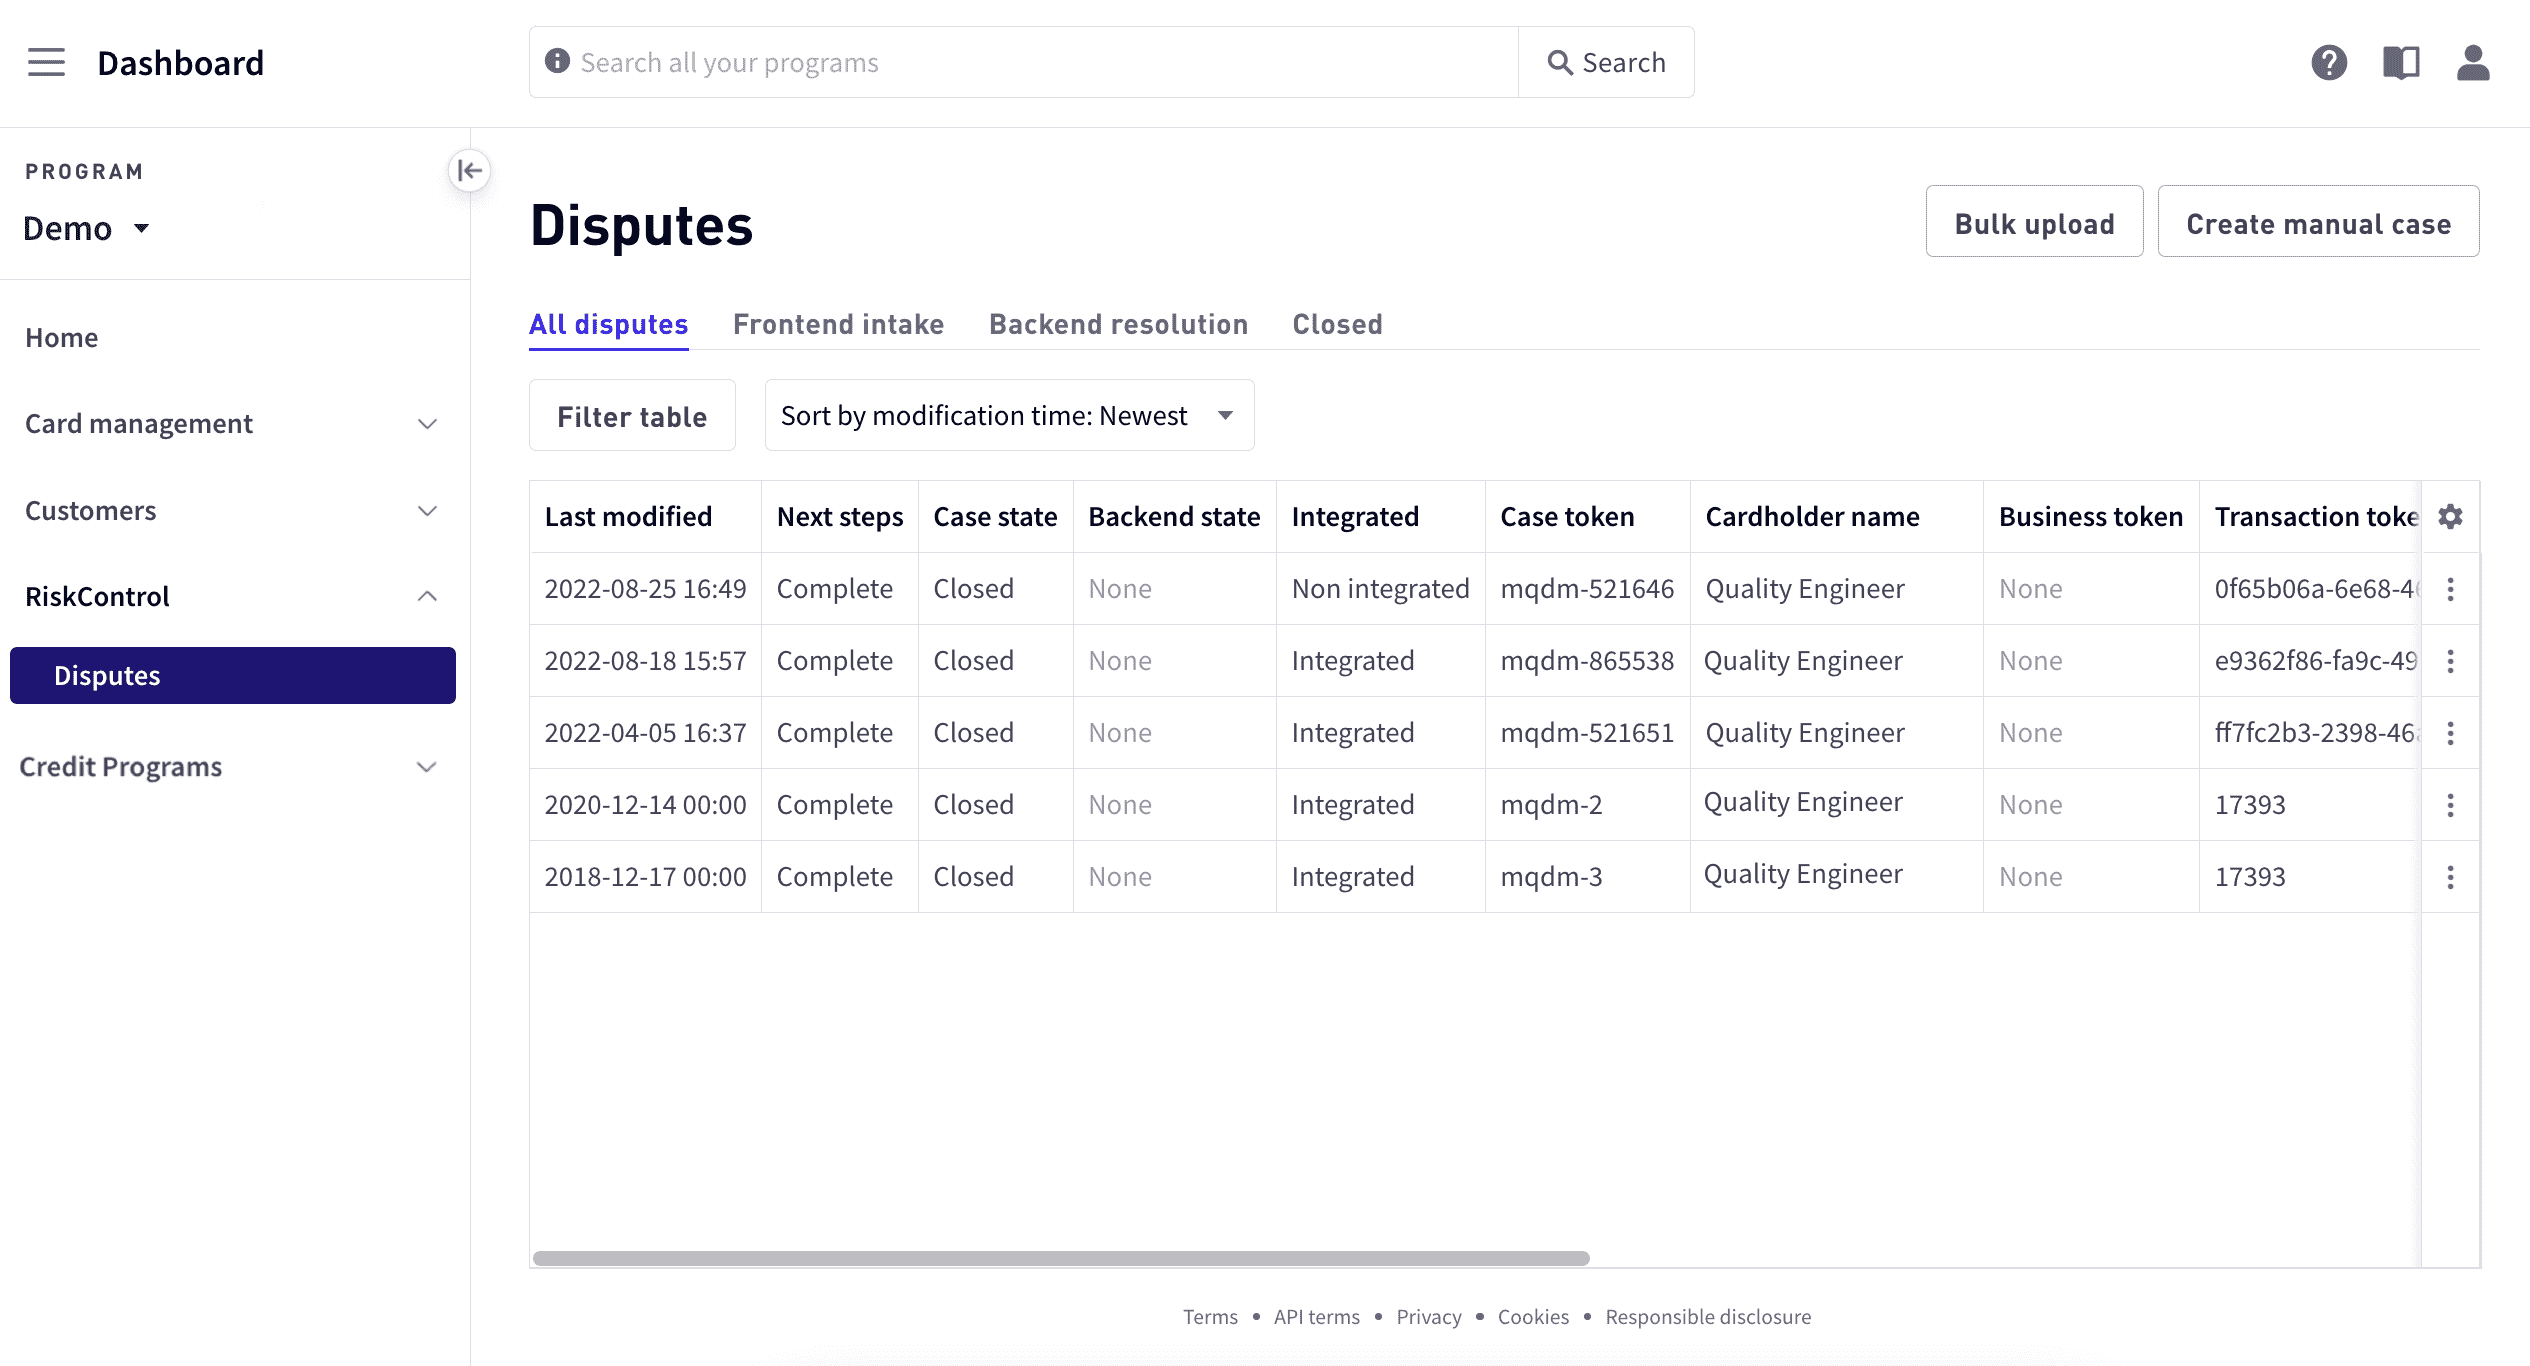
View current disputes

Is this helpful?

Yes
No

Using the dashboard, you can manage disputes by performing tasks such as:

  • Create a dispute.

  • Manage dispute progress.

  • Transition a dispute.

  • Create and manage disputes in bulk.

To manage disputes, select Dashboard in the upper-left corner, then select RiskControl > Disputes from the sidebar. To learn how manage disputes, see Disputes in the Dashboard.

Manage your credit programs

Use Credit Programs to manage your credit programs.

Policy library

Is this helpful?

Yes
No

Using Credit programs, you can manage your credit programs including:

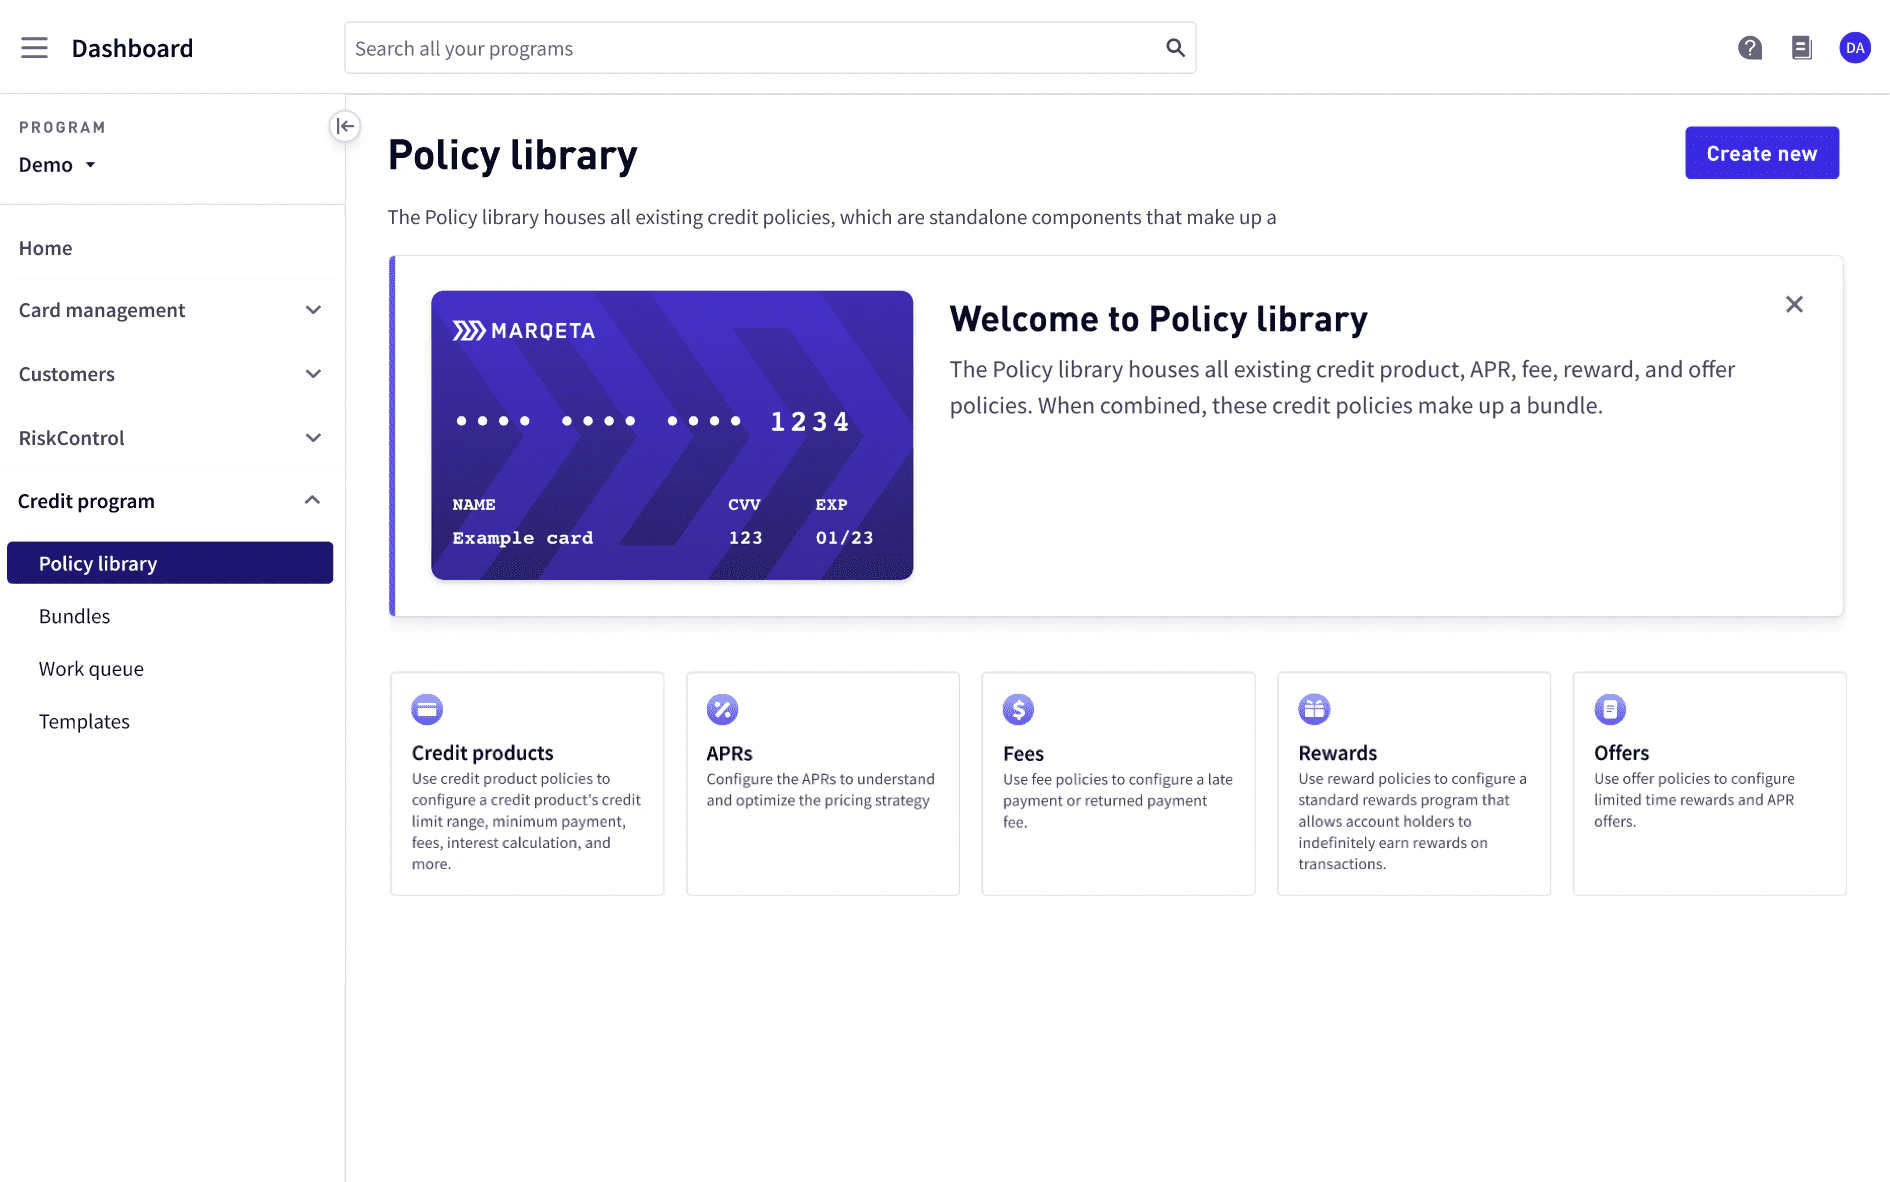
  • Create and view credit policies for credit products, APRs, fees, and rewards.

  • Create, activate, view, and archive bundles.

  • View templates available for the program to use.

To manage credit programs, select Dashboard in the upper-left corner, then select Credit programs from the sidebar. For detailed information on how to manage your programs, including step-by-step procedures, see Managing Credit Programs in the Marqeta Dashboard.

Access developer tools

The Dashboard provides tools for integrating with the Marqeta platform. You can get authorization credentials to send requests to your public sandbox and view a transaction history for your sandbox’s cards. For more about development, see Core API Quick Start and Introduction in the Core API Reference.

Get API keys for your public sandbox

Use API Keys to set up authorization credentials that allow you to send requests to your public sandbox. For more information, see Authentication in the Core API Reference.

To get your credentials and set up your public sandbox:

  • In the Dashboard, select Program Controls in the upper-left corner, then select Development > API Keys in the sidebar.

  • Copy and paste the credentials below.

  • Use the base URL to build your endpoints.

  • Use the sample cURL to view the details of the card product that was created for your public sandbox.

Application token

The token to identify your API client. Think of it as your username.

Admin access token

Allows you to access your public sandbox. Think of it as your secret password.

Base URL

Append endpoints to this URL when making API requests.

Try out your sandbox

Run this code in a terminal window to view the details of the card product that was created for your public sandbox.

View a transaction’s history

You can view the lifecycle of a card token in your public sandbox using the interactive Transaction Timeline tool. All public sandbox accounts with the Developer role include access to the Transaction Timeline.

The Transaction Timeline helps newcomers to the Marqeta platform quickly understand the role played by transaction flows in their integration, as well as in the broader payments space. It demonstrates line-by-line how individual transactions impact each other, and how they affect the account balance.

To view a card token’s transaction history using the Transaction Timeline:

  • After simulating at least one transaction in your public sandbox, access the Transaction Timeline by logging into the Marqeta Dashboard.

  • Select Program Controls in the upper-left corner, then select Development > Transaction timeline.

  • Pick one of your card tokens from the list of existing active cards that appear in the drop-down list on the right side of the screen.

  • The tool automatically builds and displays a history of all the transactions completed on that card. New transactions are added to the timeline as they occur in your public sandbox, with no need to refresh the page. Content in the Transaction Timeline is not cleared when you log out of Marqeta Dashboard and it never expires, enabling you to accumulate a rich dataset of simulated transactions over time.

For more about the available balance or the ledger balance, click the value in the Transaction Timeline’s events table to reveal a tooltip.

To filter on a particular series of related transactions, select the Apply filter button. To remove the filter, click the Remove filter button.

To copy the event token to the clipboard, select the Copy event token to clipboard button.

For more about cards and card tokens, see Cards in the Core API Reference.

Manage your webhooks

Webhooks are real-time notifications to keep you informed of specific events that occur within your public sandbox or program integration. For example, you could create a webhook to send state.activated events to your application’s webhook URL that would inform your cardholder when a card has been activated.

With the Marqeta Dashboard, you can configure and manage up to five webhooks.

To add a webhook:

  • Select Program Controls in the upper-left corner, then select Development > Webhooks.

  • Select Add webhook.

  • In the screen that appears, enter the webhook details per the table below, then select Save.

Fields Description

Name

string
required

Descriptive name of the webhook.

Allowable Values:

64 char max

URL

string
required

URL of your webhook endpoint.

Allowable Values:

  • 255 char max

  • Must be HTTPS

  • Empty string not allowed

Authentication username

string
required

Username for accessing your webhook endpoint.

Allowable Values:

50 char max

Authentication password

string
required

Password for accessing your webhook endpoint.

Allowable Values:

  • 20-50 characters

  • Must contain at least one numeral

  • Must contain at least one lowercase letter

  • Must contain at least one uppercase letter

  • Must contain at least one of these symbols: @ # $ % ! ^ & * ( ) \ _ + ~ ` - = [ ] { } , ; : ' " , . / < > ?

Custom headers

object
optional

Contains information about the webhook’s custom HTTP headers for outgoing calls.

Allowable Values:

To disable a webhook:

You have the option of disabling an activated webhook that you do not want to use; you can always reactivate it later on if necessary. It is not currently possible to delete a webhook once it has been created.

  • Select Program Controls in the upper-left corner, then select Development > Webhooks. A list of all the webhooks you have created, regardless of state, is displayed.

  • Do one of the following:

    • Disable from the summary page of all your webhooks:

      • Select a new state for the webhook by making a selection in the State drop-down list.

    • Disable from the selected webhook’s own Details page:

      • In the Name column, select the webhook you want to disable. The page refreshes to display details of the selected webhook.

      • Select Disable webhook.

      • When prompted to confirm your actions, select Disable.

To reactivate a disabled webhook:

If you have previously disabled a webhook, you must reactivate it before the Marqeta platform will resume sending event notifications to the specified URL.

  • Select Program Controls in the upper-left corner, then select Development > Webhooks. A list of all the webhooks you have created, regardless of state, is displayed.

  • Do one of the following:

    • Reactivate from the summary page of all your webhooks:

      • Select a new state for the webhook by making a selection in the State drop-down list.

    • Reactivate from the selected webhook’s own Details page:

      • In the Name column, select the webhook you want to reactivate. The page refreshes to display details of the selected webhook.

      • Select Reactivate webhook.

      • When prompted to confirm your actions, select Reactivate.

To update a webhook:

  • Select Program Controls in the upper-left corner, then select Development > Webhooks. A list of all the webhooks you have created, regardless of state, is displayed.

  • In the Name column, select the webhook you want to update. The page refreshes to display details of the selected webhook.

  • Enter the webhook details per the table below, then select Save.

Fields Description

Name

string
required

Descriptive name of the webhook.

Allowable Values:

64 char max

URL

string
required

URL of your webhook endpoint.

Allowable Values:

  • 255 char max

  • Must be HTTPS

  • Empty string not allowed

Authentication username

string
required

Username for accessing your webhook endpoint.

Allowable Values:

50 char max

Authentication password

string
required

Password for accessing your webhook endpoint.

Allowable Values:

  • 20-50 characters

  • Must contain at least one numeral

  • Must contain at least one lowercase letter

  • Must contain at least one uppercase letter

  • Must contain at least one of these symbols: @ # $ % ! ^ & * ( ) \ _ + ~ ` - = [ ] { } , ; : ' " , . / < > ?

Custom headers

object
optional

Contains information about the webhook’s custom HTTP headers for outgoing calls.

Allowable Values:

To manage event listeners:

Use the Event listeners tab to specify which Marqeta events you want the selected webhook to listen on.

You can add as many or as few events as you need to a webhook, then fine-tune your webhooks as your development progresses. For example, when starting out, you might want your application to listen for all event types. Later on, you might subscribe only to specific transaction events such as authorization.clearing and authorization.atm.withdrawal.

  • Select Program Controls in the upper-left corner, then select Development > Webhooks. A list of all the webhooks you have created, regardless of state, is displayed.

  • In the Name column, select the webhook whose event listeners you want to manage. The page refreshes to display details of the selected webhook.

  • Select the Event listeners tab. A searchable, hierarchical list of all events you can listen on is displayed.

  • Browse and search the list until you have identified and selected the appropriate events, then select Save selected events. A confirmation is displayed, and the total number of selected events is indicated below the list.

At any time, you can verify that your webhook is working properly by selecting Send test event. After you confirm your actions, the displayed health check payload is delivered to the currently selected webhook. Marqeta Dashboard informs you via a toast notification once the test event has been successfully sent.

Manage options and users

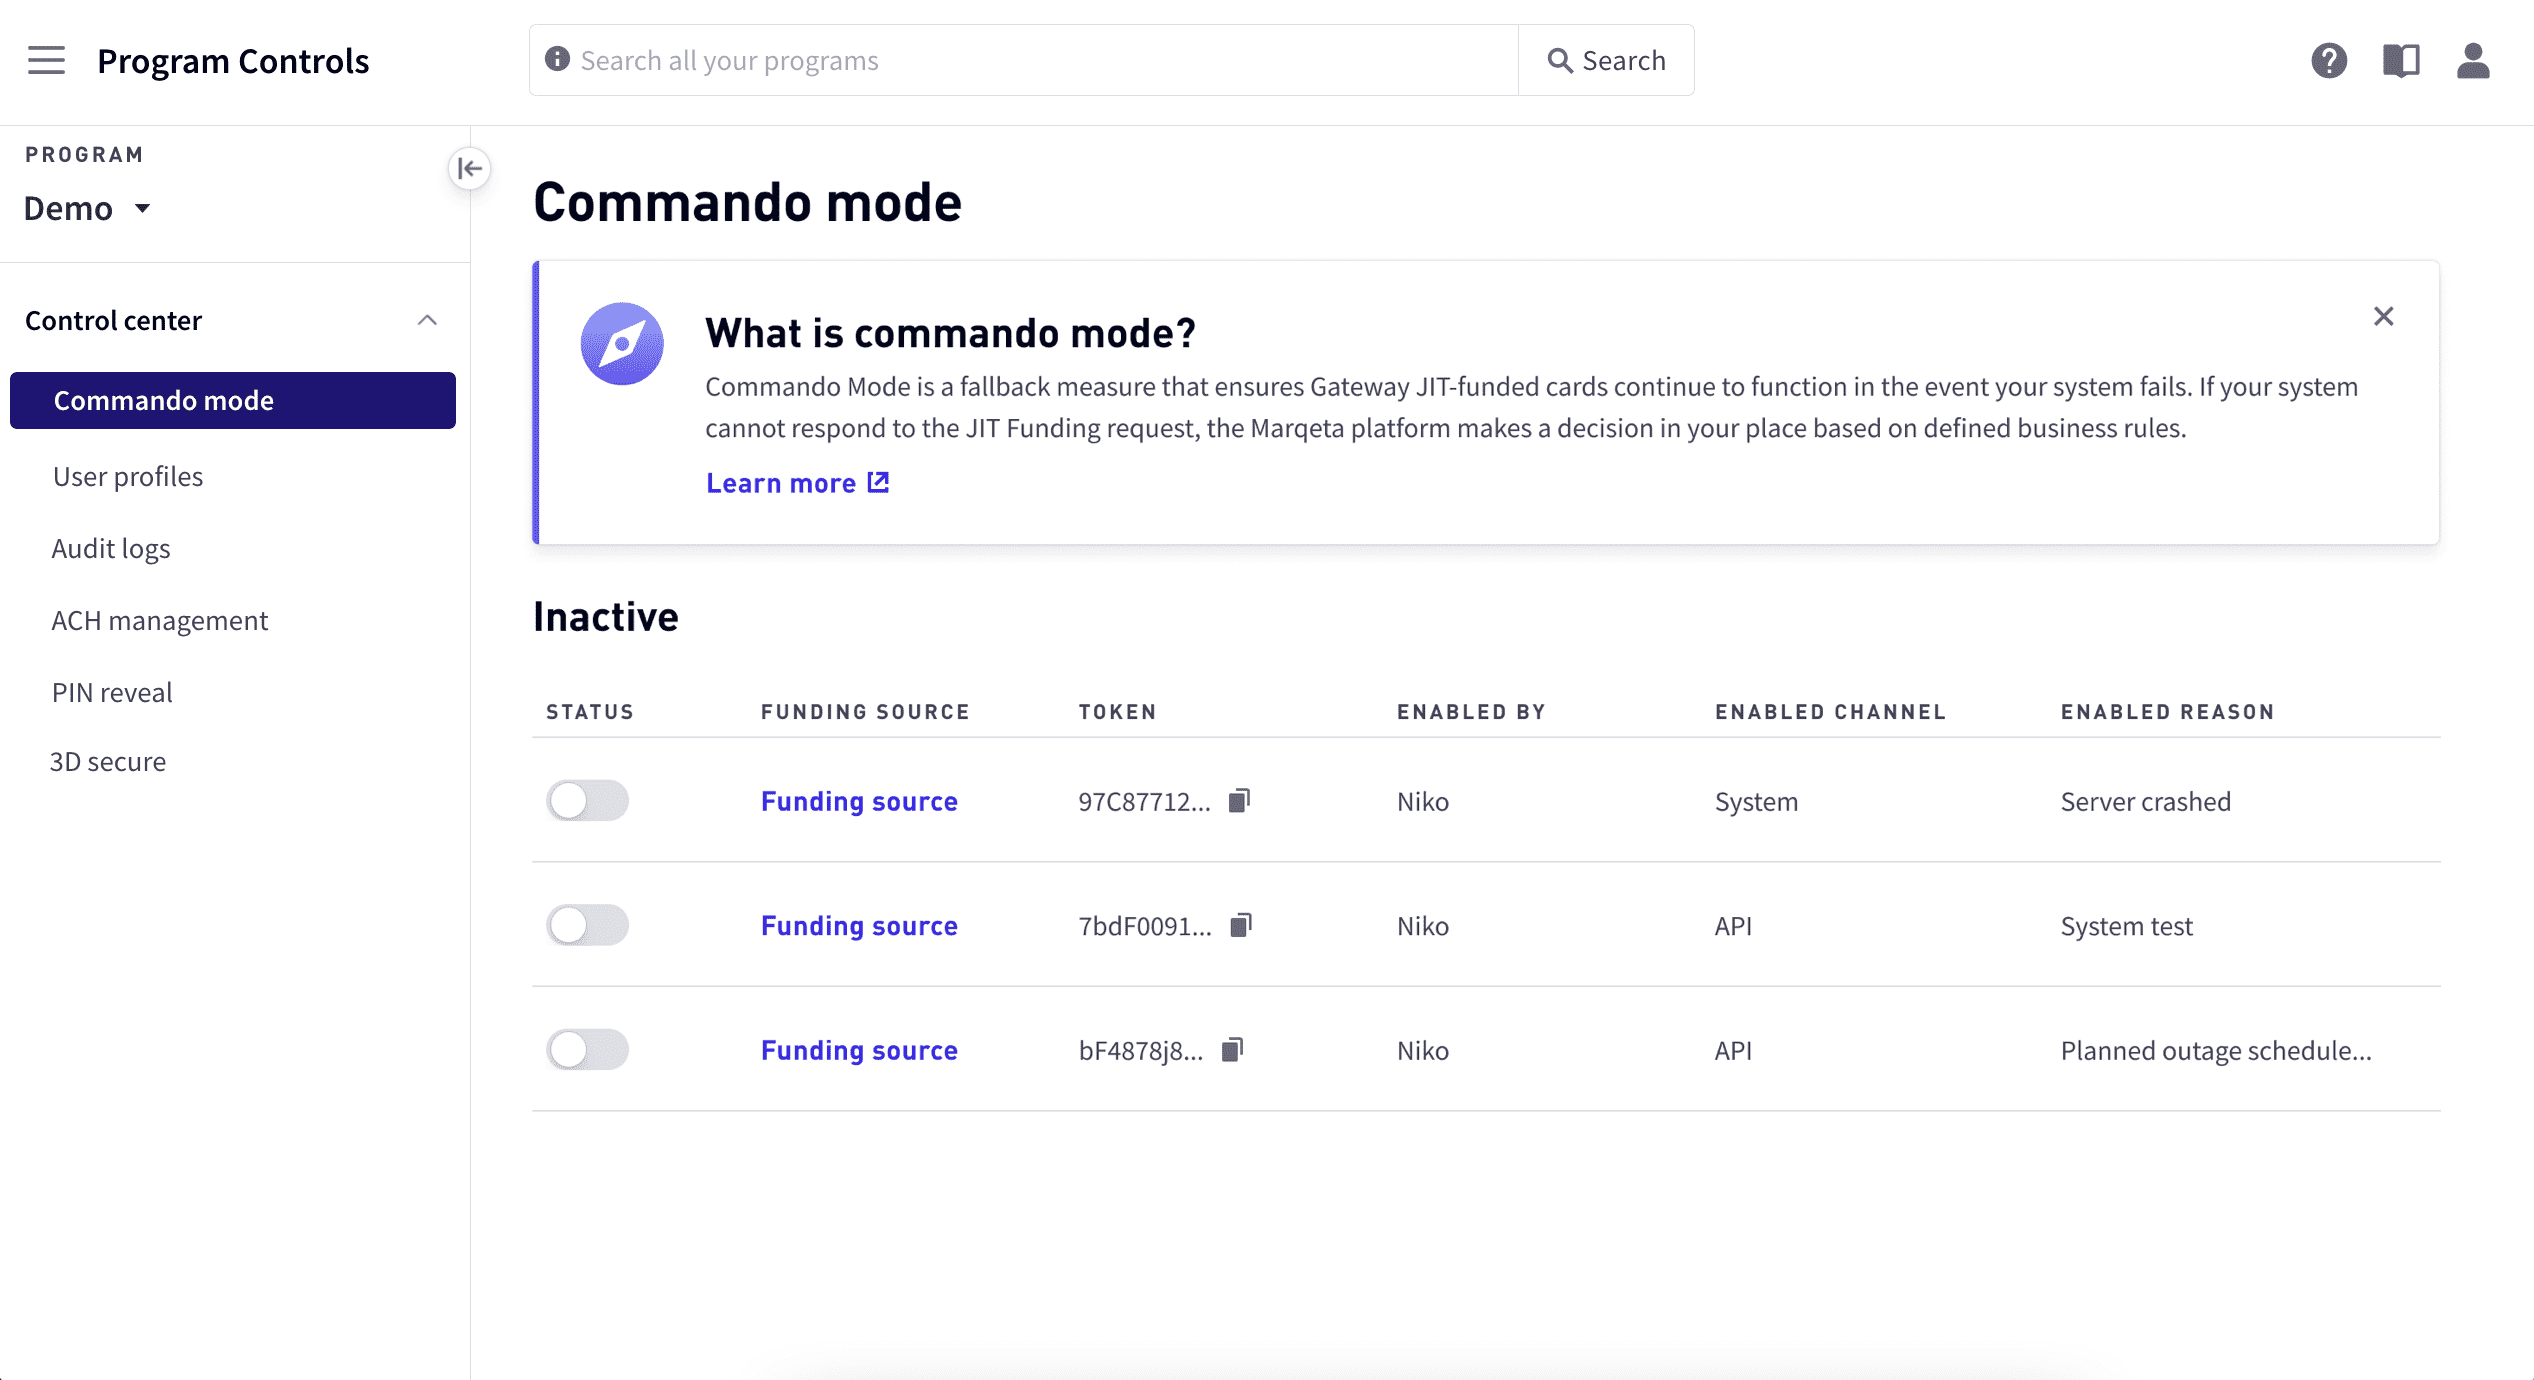
The Control Center allows you to manage Dashboard options and users, including:

  • Enable or disable Commando Mode.

  • View audit logs.

  • Manage ACH direct deposit.

  • Enable PIN Reveal and view history.

  • Enable 3D Secure.

  • Manage user access by adding and removing users, defining user roles, and impersonating users.

Home

Is this helpful?

Yes
No

To manage options and users, select Program Controls in the upper-left corner, then select Control center from the sidebar. For more information, see Control Center in the Dashboard.

Subscribe to our developer newsletter