

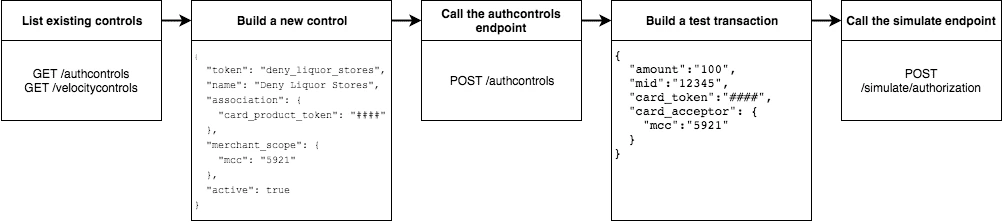
Step 1 — List existing controls
Before creating a new control, consider any existing controls you might have at the program and card product levels. To view existing authorization controls, send aGET request to the /authcontrols endpoint.
Make sure you understand your program’s default authorization behavior (allow vs. deny). In the public/private sandbox environment, the program’s default behavior is set to globally allow transactions at all merchants.
Step 2 — Design your controls
The business logic of the control you want to add determines the data you include in your request.- To block spending at all liquor stores, include the merchant category code in the
merchant_scopeobject. - To apply the control to all users in your card product, include the card product token in the
associationobject.
- Create a meaningful name for the control: e.g.
Deny Liquor Stores. - Create a unique token for the control: e.g.
deny_liquor_stores.
Warning
Do not use the example tokens shown in the tutorial while working in your public or private sandbox environment. If an object with the same token already exists, the system will handle the request as a duplicate, and your request will not take effect.
Do not use the example tokens shown in the tutorial while working in your public or private sandbox environment. If an object with the same token already exists, the system will handle the request as a duplicate, and your request will not take effect.
Step 3 — Set up the authorization controls
The following code block provides a JSON-formatted sample message body for creating your control. Copy the code sample and paste it into the body field of yourPOST /authcontrols request. Replace any placeholder text (**UNIQUE TOKEN**, **CARD PRODUCT TOKEN**) with your sample data, then submit the request. Review the response to ensure you successfully created the authorization control.
JSON
cURL
Step 4 — Confirm the new control exists
To confirm that you created the control, send aGET request to the /authcontrols endpoint using the card product token you used previously. Replace any placeholder text (**CARD PRODUCT TOKEN**) with your sample data. Your new control should be included in the returned list.
HTML
Step 5 — Call the /simulations/cardtransactions endpoint
To test if the control functions properly, simulate an authorization transaction by sending aPOST request to the /simulations/cardtransactions/authorization endpoint. Test several transactions that each force the Marqeta platform to allow or deny them.
The following sample message body creates a transaction that the Marqeta platform denies because of the authorization control created in the tutorial. Replace any placeholder text (**YOUR CARD TOKEN**) with your sample data. Change the MCC and resubmit the request to simulate a transaction that Marqeta allows.
JSON
Samples
Use the following samples to help build your program’s spend controls. Each sample includes a description of the use case and sample JSON and cURL code snippets.Allow user spending at a single merchant
You can limit a user’s spending to a single merchant. This is handy if you are creating a rewards card that should only be used at a specific retailer or service. (Depending on your program’s default authorization behavior, the same control could be used to block spending at a single merchant.)JSON
cURL
Limit spending to $100 per day
Using a velocity control, you can cap the amount a user spends in a given timeframe. If, for example, you know your cardholders shouldn’t spend more than $100 per day, you could use a velocity control to deny any transactions beyond that limit.JSON
cURL
Limit spending to $100 per transaction
You can limit a user’s per-transaction spending by creating a velocity control with thevelocity_window field set to TRANSACTION.
JSON
cURL
Limit users to one transaction per week at a category of merchants
You can limit a user’s maximum number of transactions for a given time period. For example, you can create a limited-use card product that prevents users from spending too frequently at a given merchant or category of merchants, such as hotels and motels. This is handy if you know how frequently a cardholder should be spending with their card.JSON
cURL
Limit users to a single purchase
You can add a velocity control that allows a user to spend exactly once. By setting the usage limit to one (a single transaction) and the velocity window to lifetime, users can spend up to the amount limit once. Any future attempts to spend are blocked.JSON
cURL
Limit ATM withdrawals and bank transfers
You can create a velocity control to limit the funds users can withdraw from ATMs or transfer from a bank. By setting the spending limit for ATMs and bank transfers to $0, the user can only make retail purchases.JSON
cURL
List all velocity controls for a single user
You can retrieve a list of all velocity controls applied at the program level, or use a query parameter to filter the list of controls by user or card product.HTML
cURL